WatchKit Adventure #2: Minimum Viable Complication
This post is the second (or technically third) part of my series about building a WatchKit app that shows current air pollution level on the watch face. If you haven’t seen the previous parts, you might want to at least take a look at the intro.
Last time we’ve talked mostly about the general architecture of a WatchKit app. So logically it would now make the most sense to start with the main part of a watch app, the main app UI. After all, this is the only part of the app that’s required - both notifications and complications are optional if you don’t need them. This is what people normally think of when they talk about “an app”.
However… the whole thing started with me wanting to see the level of air pollution right there on the watch face, as quickly as possible. One of the three main rules of watchOS design is that apps should be glanceable, which means that you should be able to glance at the watch and see the information you need in as short time as possible, ideally within a couple of seconds at most - and a complication lets you see this information much much faster than the main app UI accessible from the app launcher.
It was also mentioned during at least one presentation that unlike on iOS, here the main UI does not need to be the most commonly used part of your app, if notifications or a complication make more sense for your use case. It can very well be something that users only fall back to sometimes when they need to see more detailed information or perform some actions.
So, why don’t we skip the view controllers for now and just build a complication?
And that’s exactly what I’ve started with. I’ve built a simple “MVP” version of an app with just a complication (and just in 1-2 variants) during the Christmas break. It has no UI whatsoever, the main view is just an empty black box, the storyboard is unchanged from the template, and I haven’t written a single line of code that touches any WKInterface* object.
But this app with no UI already serves its purpose - I’ve been running and testing it since the end of December, and it already provides me with the information I wanted. Sure, it could let me choose the measuring station and the specific parameter (PM10, PM2.5, NO2 etc.), or use a more precise source of data, or show me a chart of the previous few hours. This would all be useful, but the only essential part is showing a single number on the watch face and updating it once an hour, and that already works:
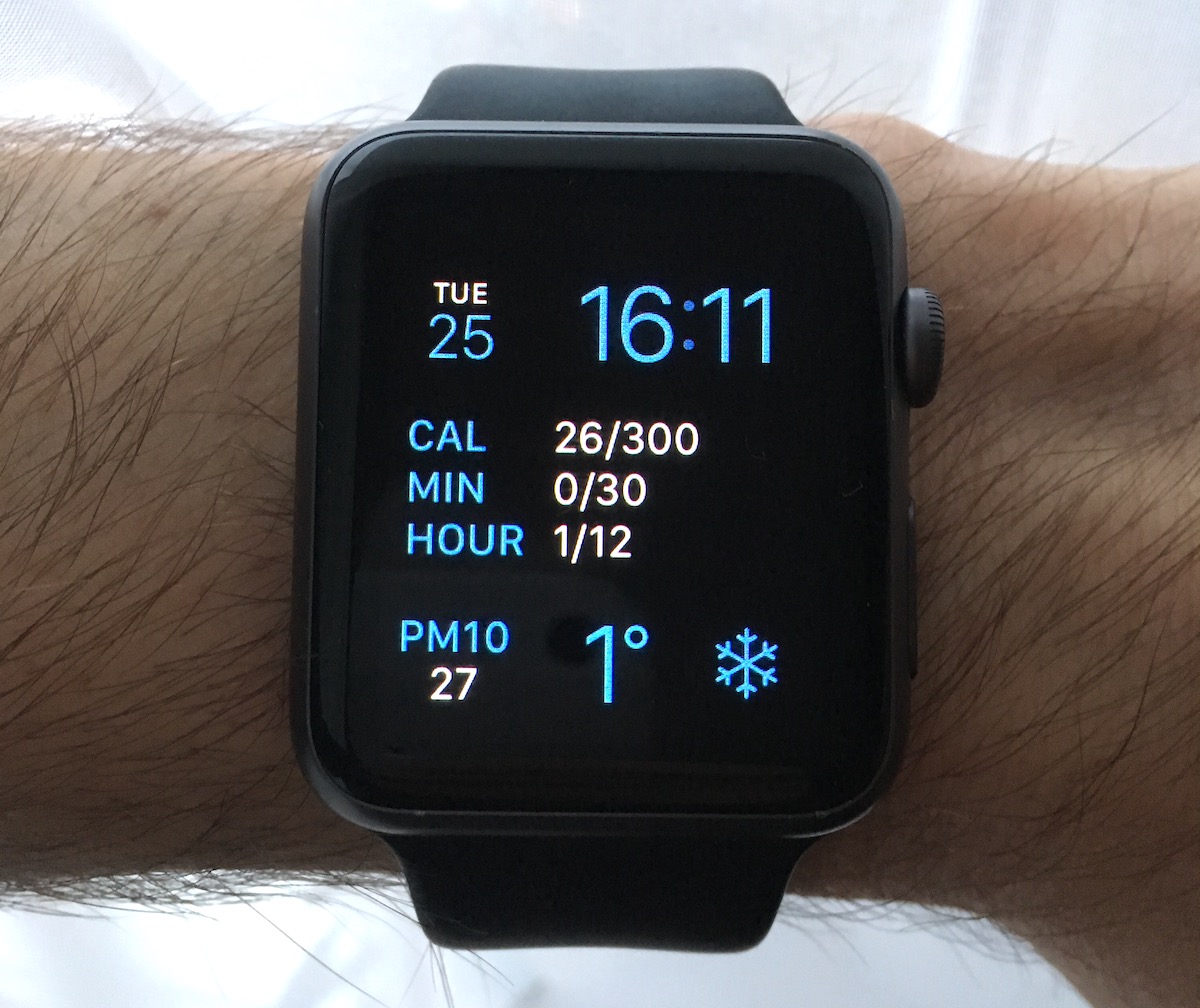
Yeah, coding on Christmas - don’t judge me
It took me much longer to start writing this post than I planned, but not because of procrastination - I’ve just been testing the app in so many different combinations in order to learn how the SDK exactly works, what to expect and what I need to take into account when writing the app to cover all edge cases. There will be time to talk about this later, but for now let’s build this simplest possible version that just gets some JSON data from a web service every hour and displays it in a complication, ignoring all edge cases and best practices for now.
But first, a little bit of theory 😏 (better get used to this…).
The complication timeline
The APIs used for managing complications are grouped into a framework separate from WatchKit, named ClockKit, with the prefix CLK.
As I mentioned in the overview in the last post, complications are implemented in a very different way than what we are used to because of the time and battery constraints.
A few complications are usually visible on the current watch face every time you raise your wrist. When the watch’s screen lights up, you need to see the rendered complication widget immediately, and the data it shows should be up to date if possible - the user will probably look at it for a second or less, and there’s no time to start a network request at that point.
So Apple had to come up with a way to satisfy all those requirements without letting apps run their extensions in the background 24/7, because then the watch wouldn’t last a full day on one battery charge. And they did come up with something pretty smart.
Here’s how it works: your app specifies a complication data source (CLKComplicationDataSource), and then whenever it receives some new data (when running in the foreground, or more likely in the background) it tells the complication server (CLKComplicationServer) to refresh the data through the data source.
The data source then returns a timeline of data (a collection of CLKComplicationTimelineEntry objects) - the timeline tells watchOS what number, text, icon or combination of those should be shown in the complication widget from a given point in time until the next point. The system then caches this data and uses it to automatically update the displayed content for you at the right moment - your app only needs to be woken up to return the timeline, but it isn’t needed afterwards. You could possibly prerender a whole day’s worth of content, showing a different value every 30 minutes (as long as you have data that much in advance), and the OS will update your complication at the right intervals, even if your app doesn’t run again at all during that day.
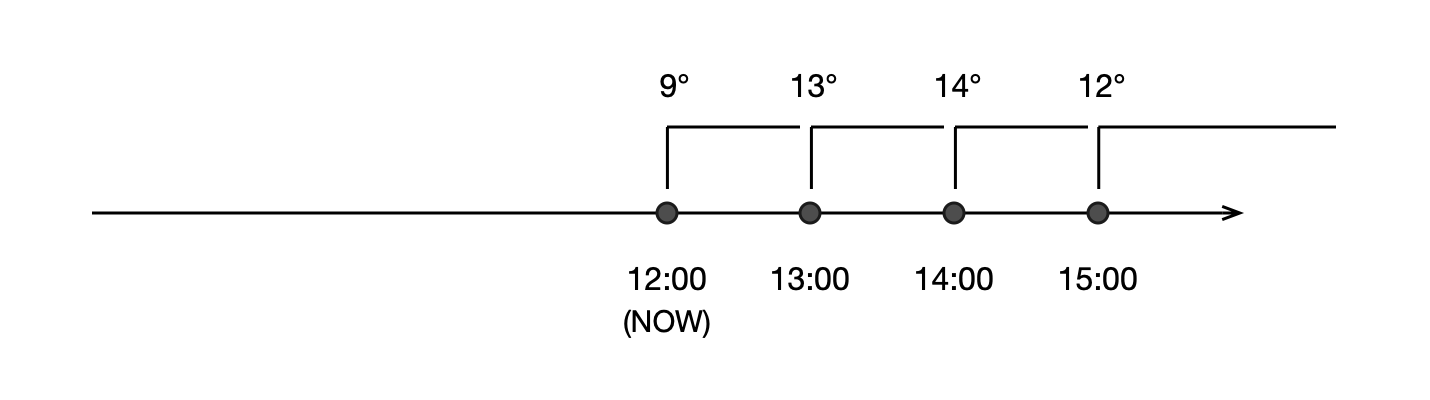
This is how you could draw a timeline for the classic weather app example (the dots mark timeline entries, and the lines above show how long each entry is displayed):
And this is what you’d have in the calendar app’s complication:
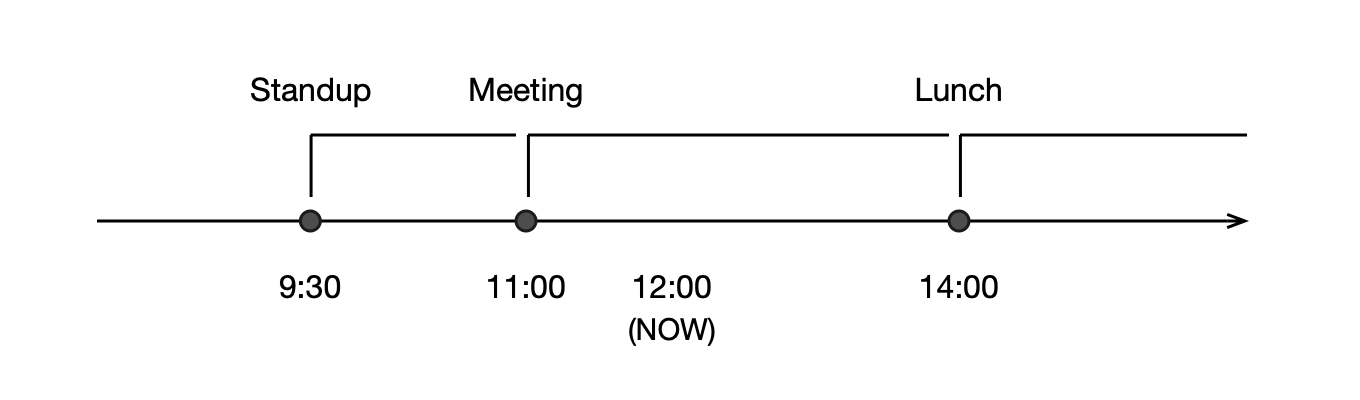
Notice that the weather app only provides data for the future (since most weather APIs only return weather forecasts, but don’t record historical data), while the calendar app’s timeline goes both ways (since we don’t need any external data to render it). Depending on the kind of app, you will sometimes have future or past data, or both, or only the single current state.
In our case, we will only have past data - this kind of pollution I’m interested in is impossible to predict precisely, because it’s affected by several different factors, some of which are caused by humans (like burning coal to heat homes).
Time Travel
The timeline was also designed with another watchOS feature in mind, namely the “Time Travel” which allowed you to scroll time on the watch face forward and backward, and scrolling it backward updated the complications to their values from the left side of the timeline - letting you see e.g. how a game score was changing during a match, or how a stock price changed during the day.
Time Travel was added in watchOS 2 together with complications, but since watchOS 3 it was off by default (effectively only used by power users), possibly because it could be confusing or annoying when it was triggered accidentally. In watchOS 5 it was removed completely, which means that there isn’t now any way to even debug the past data points on your timeline even if you wanted to. So in practice, there’s no point implementing the parts of the complications API that handle past values (most of the data source methods are optional).
Future values still make sense of course - there’s no way to quickly scroll to them, but time travel still works in that direction - just one-way and at a constant pace 🙃
Interestingly, the now useless parts of the API weren’t deprecated - which could mean that Apple is considering bringing this feature back in future in some other shape (and I just got a radar update about a piece of documentation in one of those methods mentioning Time Travel, that they removed those references, so it seems intentional).
Complication families
In watchOS 5 you can choose from as much as 26 styles of watch faces. Different kinds of watch faces can fit different amounts and different shapes of complications on them. These shapes or variants of complication spaces are called complication families, and there are currently 10-11 families available:
- Modular Small, used all over the classic Modular face and also in the corner of the Siri face
- Modular Large, used only in one place in the middle of the Modular face
- Circular Small, used on a few different watch faces (e.g. Activity)
- Utilitarian Small (with a “flat” variant) and Utilitarian Large, used on more than half of all watch faces to display one horizontal line of content (it also has a mode that can be confused with Circular Small)
- Extra Large, only on the X-Large watch face
- Graphic Corner, Graphic Circular, Graphic Bezel and Graphic Rectangular, used only on the two new Infograph watch faces on the Series 4 Apple Watch
You can support any subset of these you want, although of course a good app should ideally support all of them, since different people prefer different kinds of watch faces (e.g. I mainly use Modular, Siri, Timelapse and Solar faces, and I never use any of the faces with analog time).
To keep things simple, we’ll only add support for Modular Small and Circular Small for now (which should cover around 11 faces, if I’m counting correctly). We’ll add support for the whole range later.
Content templates
Because of the resource contraints, in most cases your app can’t actually draw whatever it wants on the assigned complication space, you also can’t use standard WatchKit interface elements or do any layout. Instead, each of the complication families mentioned above has one or more predefined templates which specify the arrangement and types of content it can contain. The only choice you have is which template you choose for a given space and what text/icon/value you put inside it.
For example, the Circular Small family has 6 available templates:
.ringImage, an icon in the center and a ring around it, where you can specify what part of the ring is filled.ringText, a ring with text inside (in practice, usually a 1-3 digit number).simpleImage, just an icon.simpleText, just a short label.stackImage, a tiny icon above and a short label below.stackText, two short lines of text
Most templates only have space for an extremely small amount of content, and in some cases you may have to think really hard how to use the given space to show anything of use. Of course it’s perfectly fine to just not support a given complication family if you can’t figure out any way to display your content there. The only complication families that allow for some longer or more complex content are: Modular Large, Utilitarian Large and some of the Graphic ones for Series 4 (and surprisingly, not Extra Large).
Your app may have a few different states - e.g. having / not having data, empty or non-empty item list, having an activity in progress or not etc., and in that case it’s totally fine to use different templates for a given complication depending on the state (e.g. a number in some states and an icon in others). Each time you construct the timeline you create fresh template objects and fill them with content, so you can even use a random template every time if that’s what will make you happy 😉
Text and image providers
To allow a bit more flexibility in rendering different kinds of content, the timeline data is not returned as simple String and UIImage objects, but instead it’s wrapped in one of the available provider objects. These providers allow your content to be more dynamic and change with time or depending on the context.
For text, the simplest option is CLKSimpleTextProvider, where you just specify a single string and optionally a shorter version to use if the full text doesn’t fit.
Alternatively, there are a few text providers for time-related content:
CLKDateTextProviderwhich prints a date (day/month)CLKTimeTextProviderwhich prints a specific time (hour/minute)CLKTimeIntervalTextProviderfor time ranges (from-to)CLKRelativeDateTextProviderwhich prints time since/until another date (e.g. “in 2 hours”)
The last one updates itself automatically as the time goes and you only need to configure it once with the target timestamp, instead of having to update it manually every hour or more often with strings like “in 5 hours”, “in 4 hours” and so on.
For images, you usually use CLKImageProvider. It lets you specify a template image (i.e. one which is rendered in monochrome) and a color. However, the color is ignored in most cases - most watch faces render all complications in a single color selected by the user (or a single color + white). There is a CLKFullColorImageProvider that renders images in full color, but it’s only used on the new Infograph watch faces (in the Graphic complications).
The complications on the analog Infograph face also use a couple of CLKGaugeProvider providers - these are used for configuring the colorful arcs in the corners of the new watch face.
Let’s go! 🚀
With that basic knowledge, let’s start building our “MVC”. You can follow with me in your Xcode if you want, or you can download a zip with a complete project if you prefer.
First, create a new project - use the template “watchOS > iOS App with WatchKit App”. Make sure the “Include Complication” checkbox is checked.
This creates a project with 3 targets:
- SmogWatch, which is the iOS app (we won’t be touching it for now)
- SmogWatch WatchKit App, which is the UI part, containing only the storyboard (with the main UI and possibly notification scenes) and an asset catalog
- SmogWatch WatchKit Extension, which will contain all of your WatchKit code
You can select “SmogWatch WatchKit App” target in the navigation bar and one of the available simulators and run the app. You should see a watch simulator, showing the watch face, then a loading spinner and finally an empty black screen with the time above. (If you’d prefer a different set of iPhone/Apple Watch models, go to Window > Devices and Simulators, Simulators tab, click the “+” in the bottom-left corner, and choose the combination you want - make sure to check “Paired Apple Watch”.)

Designing the template
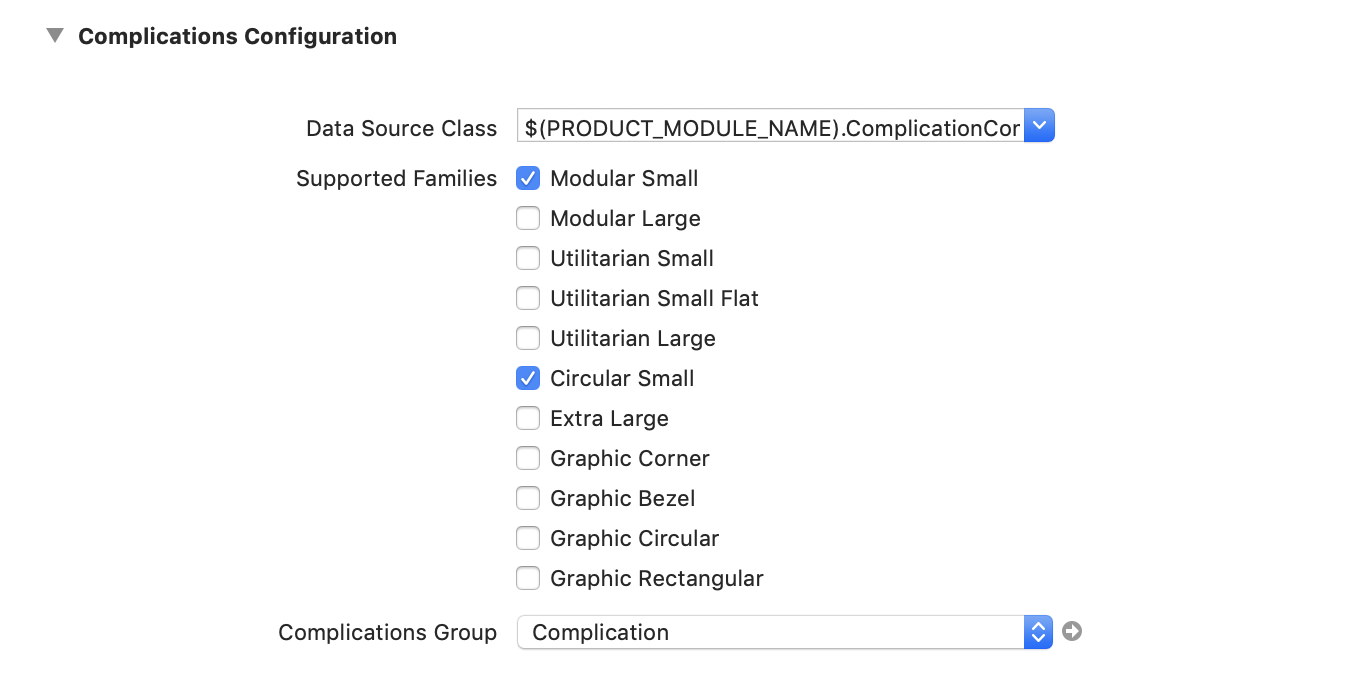
As I mentioned, to keep things simple we’ll only implement the Modular Small and Circular Small complication families for now. By default all available families are enabled, so to make sure that we aren’t asked about one of those we don’t support in the callback methods, we’ll disable all except these two.
Open the target configuration page for the “SmogWatch WatchKit Extension” target, and in the “General” tab you should see this list where you can toggle complication families:
Now, we need to decide which templates to use for each complication family. In the ClockKit documentation, find the Modular Small family on the list. On that page, you can see a list of all 7 available template classes for a given family and how they look on the screenshot.
In our case, we mostly want to show a fairly small number (2, sometimes 3 digits). We have a few options that could make sense:
- show just a number e.g. “75” - this would make it very readable, but it could be not obvious at first glance what this number is (or which app is it even from)
- show a number in a circle - but how should the arc be calculated, if there’s no top limit for how high it can go? also, it would look exactly like the battery complication
- show a number with some kind of icon above
- show two lines of text - the value and the parameter name
In the end, I settled on something like this:
This solves the problem of making it obvious what app this is, and at the same time it will make it possible to later add a selection from a few available parameters and then explain more precisely which one it’s showing. The downside is that it makes the font smaller, especially with 3 digits, although for me it’s still quite readable, and definitely not as bad as the Circular Small version.
For Circular Small, the choice of templates is very similar, so I’ve also chosen the two lines of text variant:

This one is much less readable, but Circular Small is in general a complication family with a very little usable area and it’s probably the most challenging of all to use. It doesn’t look much better with Apple’s own complications, like World Clock or Sunrise/Sunset. We could drop the “PM”, but then again we won’t know which app this is from, or we could show the full parameter name “PM10”, but then it just gets too crowded in this tiny space, so this sounds like the most reasonable compromise. Perhaps some kind of icon in the top line would work better, I might try that later.
Implementing the Complication Data Source
Now, open the sample ComplicationController class. It already has all required methods of the data source protocol and some more with empty implementations, but we won’t actually need most of them.
Notice that all of the methods return data through a handler callback. This allows you to load the required data in some asynchronous way if you need to - you could even theoretically load it from the network on demand at that point (although you absolutely should not do that).
All of the methods also pass a CLKComplication object as the parameter, which lets you see what kind of complication the system is asking you about. The object only has one field named family, which means you can’t tell the difference between two instances of your complication on a Modular watch face next to each other, but you can tell if you’re returning data for a Circular Small or a Modular Small complication.
This, of course, is absolutely essential information - not only because each complication family looks very different, but also because the compiler will happily let you return e.g. a “Circular Small Ring Image” template for a Modular Small complication, but you will get errors or crashes at runtime if you do that by mistake (which really isn’t that hard to do).
The only two methods required in the CLKComplicationDataSource protocol are getSupportedTimeTravelDirections and getCurrentTimelineEntry, but we’ll start with another, optional method first.
Sample template
The first method we’ll look at is getLocalizableSampleTemplate, at the bottom of the file - and you might want to implement it *before* you add your app’s complication to the watch face.
This method lets you return a “sample” look of your complication, which is used when the user is setting up your complication in the watch face configuration view, before your app even had a chance to run. This should just show some random data that represents how your complication will normally look - something that you’d put e.g. on the screenshots on your app’s website or on the App Store page.
In this method, we need to return a single CLKComplicationTemplate object - which is the same thing we’ll be returning for a real timeline, just without any timestamp assigned. For both complication families, we’ll use the standard CLKSimpleTextProvider to wrap the returned text. We’ll use the value “50” instead of the real one in the sample template.
func getLocalizableSampleTemplate(
    for complication: CLKComplication,
    withHandler handler: @escaping (CLKComplicationTemplate?) -> Void)
{
    switch complication.family {
    case .modularSmall:
        let template = CLKComplicationTemplateModularSmallStackText()
        template.line1TextProvider = CLKSimpleTextProvider(text: "PM10")
        template.line2TextProvider = CLKSimpleTextProvider(text: "50")
        handler(template)

    case .circularSmall:
        let template = CLKComplicationTemplateCircularSmallStackText()
        template.line1TextProvider = CLKSimpleTextProvider(text: "PM")
        template.line2TextProvider = CLKSimpleTextProvider(text: "50")
        handler(template)

    default:
        preconditionFailure("Complication family not supported")
    }
}
Remember to always return a matching template for a given complication family! Unfortunately, I don’t think there’s any good way to check this at compile time (though I’d love to be proven wrong).
Here, we’ve used the “stack text” templates for both families, so they both have line1TextProvider and line2TextProvider properties to assign, but if you choose another configuration you will be assigning properties like imageProvider, headerTextProvider, ringStyle and so on.
If the system asks us for any other kind of complication we don’t support, we’ll cause an assertion fail in the default case - this shouldn’t happen though since we’ve disabled all other types in the extension target configuration. I’m making it crash here with preconditionFailure to make sure I don’t miss anything, but it might be safer to return nil instead in a final version, just in case.
The reason I said you should add this before you add your complication to the watch face is that whatever you return from this method is cached by the system. If you change the code and run it again, you won’t see any effect - you need to delete your app from the simulator and reinstall it again to see the updated version.
Now, when you run the app, you can edit the watch face (use force touch on your MacBook’s touchpad, or see Hardware > Touch Pressure in the top menu), select a complication space and scroll to your complication:


Notice that by default your app name is the full name of the app target, which is… kinda long. To change it to something more readable, open the Info.plist for the WatchKit app target (the app, not the extension - the one with the storyboard) and change the “Bundle display name” to e.g. “SmogWatch”.
Once you exit the edit mode and get back to the watch face, you will see an empty space in the place where you put the complication - but don’t worry, we’ll take care of that in a moment.
getSupportedTimeTravelDirections
This method tells the system if your app has data points in the past, in the future, both of those, or only for the current moment. Since as I mentioned past data isn’t used anymore, it only really makes sense to either return .forward or an empty list. We won’t have access to any forecasts of air pollution level, so we can return an empty list here:
func getSupportedTimeTravelDirections(
    for complication: CLKComplication,
    withHandler handler: @escaping (CLKComplicationTimeTravelDirections) -> Void)
{
    handler([])
}
What this changes in practice is that depending on what you return, the system will or will not call the getTimelineStartDate, getTimelineEndDate, getTimelineEntries(for:before:limit:withHandler:) and getTimelineEntries(for:after:limit:withHandler:) methods, asking you about how far the timeline extends in either direction and about specific points on either side. If we return [], then we should only be asked about the current point, although the “entries after” method seems to be called regardless of what you return.
All of these methods are optional though, so if you don’t implement them, watchOS will just assume there’s nothing interesting outside of the current point.
getCurrentTimelineEntry
This is the core method of the whole protocol, it’s where we’ll return our latest data point.
The timeline data is returned as one or more CLKComplicationTimelineEntry objects. A timeline entry is simply a timestamp and a selected template with one or more data providers assigned, filled with the data you want. The entry is valid from that timestamp up to the timestamp of the next entry (if there is any).
We don’t actually have the data yet, but don’t worry about that for now - right now we’ll just return a static value of e.g. 75 like in the sample template. We use current time as the timestamp, since we won’t be asked about any period before that.
This is how our getCurrentTimelineEntry method should look like for now:
func getCurrentTimelineEntry(
    for complication: CLKComplication,
    withHandler handler: @escaping (CLKComplicationTimelineEntry?) -> Void)
{
    let entry: CLKComplicationTimelineEntry

    switch complication.family {
    case .modularSmall:
        let template = CLKComplicationTemplateModularSmallStackText()
        template.line1TextProvider = CLKSimpleTextProvider(text: "PM10")
        template.line2TextProvider = CLKSimpleTextProvider(text: "75")
        entry = CLKComplicationTimelineEntry(date: Date(), complicationTemplate: template)

    case .circularSmall:
        let template = CLKComplicationTemplateCircularSmallStackText()
        template.line1TextProvider = CLKSimpleTextProvider(text: "PM")
        template.line2TextProvider = CLKSimpleTextProvider(text: "75")
        entry = CLKComplicationTimelineEntry(date: Date(), complicationTemplate: template)

    default:
        preconditionFailure("Complication family not supported")
    }

    handler(entry)
}
When you add these two methods, build and run your app in the simulator. You should now see your complication show the configured template with the values we put inside:

If you still don’t see anything, then it means the system has cached the previous state returned from the old build. In that case you have to force it to reload the complication - to do that, switch into the edit watch face mode, scroll to a different complication in that spot, exit the edit mode, and then repeat the same steps again to switch back to your complication.
Optional methods
There are a few other optional methods in the data source protocol, but for our purposes the only one that we could possibly need is getTimelineEntries(for:after:limit:withHandler:). This method asks about any timeline points after what was passed earlier, if you have any entries to show in the future. We’d use this if we were writing an app which would know some time in advance what to show later - e.g. weather forecasts, events from the calendar, scheduled tasks from the todo list, etc. I think most apps will only want to show a single current entry though.
One way we could use this API in this app is that we could potentially in a future version mark data as outdated after some time has passed without loading newer data. If you’re looking at the pollution level measured 6 hours ago, it isn’t very useful, because the air could be much better or much worse right now - in Krakow, this can sometimes change completely in 2 hours if e.g. the wind starts or stops blowing. So we could perhaps hide the value automatically after a few hours, by always adding a second “resetting” data point a few hours after the real one. If we successfully update the data and the timeline every hour, then the second point will never be displayed, but if something goes wrong, then it’d get to this point and show something different than normally.
I think watchOS used to do this before, at least with Time Travel - the docs even mention this! - but it doesn’t seem to anymore. This is what the getTimelineStartDate and getTimelineEndDate methods are supposed to be for - since this doesn’t seem to work, I don’t think there’s any point implementing them.
Fetching real data from the web
For this first version, we’ll use publicly available data from the Małopolska Region air quality monitoring system (Polish only). They don’t have any official API, but I was told by their support that it’s OK to just make calls to the endpoints that are being called with XHR on the frontend (admittedly, that was back in 2015, but I consider that permission still valid 😎).
The frontend gets the data for the charts by making a pretty complex POST query to the URL http://monitoring.krakow.pios.gov.pl/dane-pomiarowe/pobierz and then parsing an equally complex JSON returned in response.
This isn’t really relevant to watchOS specifically and it’s specific to this single web API, so I won’t describe it in detail - here’s the whole class that fetches and parses the data:
import Foundation

private let DataURL = "http://monitoring.krakow.pios.gov.pl/dane-pomiarowe/pobierz"

class KrakowPiosDataLoader {
    let dateFormatter: DateFormatter = {
        let d = DateFormatter()

        // not sure if this is needed, but just to be safe
        // see https://developer.apple.com/library/archive/qa/qa1480/
        d.locale = Locale(identifier: "en_US_POSIX")

        d.dateFormat = "dd.MM.yyyy"

        // make sure we use CET timezone - if you're e.g. in Moscow
        // and you ask for '19.02.2019' on 19 Feb after midnight
        // (still 18 Feb in Poland), you'll get no data
        d.timeZone = TimeZone(identifier: "Europe/Warsaw")!

        return d
    }()

    // explained below
    let dataStore = DataStore()

    let session: URLSession = {
        let config = URLSessionConfiguration.ephemeral
        config.timeoutIntervalForResource = 10.0
        return URLSession(configuration: config)
    }()

    func queryString() -> String {
        let query: [String: Any] = [
            "measType": "Auto",
            "viewType": "Parameter",
            "dateRange": "Day",
            "date": dateFormatter.string(from: Date()),

            // hardcoded ID for PM10 on a specific station
            // we'll make it configurable later
            "viewTypeEntityId": "pm10",
            "channels": [148]
        ]

        let jsonData = try! JSONSerialization.data(withJSONObject: query, options: [])
        let json = String(data: jsonData, encoding: .utf8)!

        // don't ask me, that's what the API expects
        return "query=\(json)"
    }

    func fetchData(_ completion: @escaping (Bool) -> ()) {
        var request = URLRequest(url: URL(string: DataURL)!)
        request.httpBody = queryString().data(using: .utf8)!
        request.httpMethod = "POST"

        NSLog("KrakowPiosDataLoader: sending request to %@ with %@ ...",
            DataURL, queryString())

        let task = session.dataTask(with: request) { (data, response, error) in
            var success = false

            if let error = error {
                NSLog("KrakowPiosDataLoader: received error: %@", "\(error)")
            } else {
                NSLog("KrakowPiosDataLoader: received response: %@",
                    data != nil ? "\(data!.count) bytes" : "(nil)")
            }

            if let data = data {
                if let obj = try? JSONSerialization.jsonObject(with: data, options: []) {
                    if let json = obj as? [String: Any] {
                        if let data = json["data"] as? [String: Any] {
                            if let series = data["series"] as? [[String: Any]] {

                                // there would be more than one data series if we passed
                                // multiple "channel IDs" (e.g. for more than 1 station)
                                if let first = series.first {
                                    if let points = first["data"] as? [[String]] {

                                        // the data series is an array of up to 26 hourly
                                        // measurements; we only take the last one for now
                                        if let point = points.last {
                                            let date = Date(
                                                timeIntervalSince1970: Double(point[0])!
                                            )
                                            let value = Double(point[1])!

                                            self.dataStore.currentLevel = value
                                            self.dataStore.lastMeasurementDate = date

                                            NSLog("KrakowPiosDataLoader: saving data: " +
                                                "%.0f at %@", value, "\(date)")

                                            success = true
                                        }
                                    }
                                }
                            }
                        }
                    }
                }
            }

            if !success {
                NSLog("KrakowPiosDataLoader: no data found")
            }

            completion(success)
        }

        task.resume()
    }
}
Don’t forget to start the task with resume() at the end, as I did at first 😅
To sum up:
- we make a request to the API asking for PM10 data on a specific hardcoded station for the current day
- we take only the last measurement (which in most cases should be 1-2 hours old)
- if we get any data, we save a number with the PM10 concentration level (~0-200) and the time when the measurement was made
- we notify the caller if we got any data or not
This code uses the old-school JSON parsing approach with the “if pyramid of doom”, because I think in this case it’s easier to understand. You can also see an updated (and probably more elegant) Codable version on GitHub.
The reason I’m using the old, not Swift friendly NSLog is because print() appears in the Xcode console, but it doesn’t get logged to the system logs and you won’t see it in Console.app in the sysdiagnose logs, which is something you’ll need to use if you want to track your app’s behavior throughout the day when it’s not connected to your Mac. (I should probably be using os_log, but I didn’t have time to look into it yet…) 1)
Also, notice that we’re making the request in the foreground, using the most basic, standard URL session. This is not what you should normally do - ideally, all requests should use background URL sessions to save background run time - but this is an MVP after all, so this will do for now.
We do however limit how much time the URL session can spend by configuring it to time out every request after 10 seconds. It’s important to use timeoutIntervalForResource here and not timeoutIntervalForRequest or timeoutInterval, since these only work for idle time since last received packet, and we want to limit total request time. We do this because there seems to be a very specific (though undocumented) hard limit on execution time for background tasks: if an app exceeds 15 seconds of background run time, it will be killed immediately and you’ll get a crash report like this:
Termination Reason: CAROUSEL, Background App Refresh watchdog transgression. Exhausted wall time allowance of 15.00 seconds. Termination Description: SPRINGBOARD, CSLHandleBackgroundRefreshAction watchdog transgression: eu.mackuba.SmogWatch.watchkitapp.watchkitextension exhausted real (wall clock) time allowance of 15.00 seconds (…)
In case you’re wondering about the lastMeasurementDate timestamp we save into the DataStore, this is something we could potentially use to implement that “outdated data” featured mentioned earlier - the data we get might already be 2-3 hours old, so we would count the “expiry date” from the time included in the JSON response, not from the moment we saved it (but this is just an idea for later).
And what is that mysterious DataStore? It’s just UserDefaults:
private let CurrentLevelKey = "CurrentLevel"
private let LastMeasurementDate = "LastMeasurementDate"

class DataStore {
    let defaults = UserDefaults.standard

    var currentLevel: Double? {
        get { return defaults.object(forKey: CurrentLevelKey) as? Double }
        set { defaults.set(newValue, forKey: CurrentLevelKey) }
    }

    var lastMeasurementDate: Date? {
        get { return defaults.object(forKey: LastMeasurementDate) as? Date }
        set { defaults.set(newValue, forKey: LastMeasurementDate)}
    }
}
Finally, we need to add an App Transport Security exception (to the WatchKit extension target) for the API’s domain, since it doesn’t support HTTPS:
<key>NSAppTransportSecurity</key>
<dict>
  <key>NSExceptionDomains</key>
  <dict>
    <key>monitoring.krakow.pios.gov.pl</key>
    <dict>
      <key>NSExceptionAllowsInsecureHTTPLoads</key>
      <true/>
    </dict>
  </dict>
</dict>
Displaying the real data
Now, to actually load this data, we need to call this new class from somewhere. We will now take a look at the ExtensionDelegate class, which implements WKExtensionDelegate - basically a WatchKit version of UIApplicationDelegate. Like all app delegates, WKExtensionDelegate has a bunch of lifecycle methods that get called by the system at various moments: applicationWillEnterForeground, applicationDidBecomeActive, applicationWillResignActive, applicationDidEnterBackground, and so on.
The only one of these we’ll use for now is applicationDidFinishLaunching. This method is called when the app process starts - either by launching the UI from the app launcher or Xcode, or in the background, when the app needs to be called but was cleaned up by the system earlier (which happens pretty often, especially during the night).
Whenever the app is launched or restarted in the background, we want to use this opportunity to immediately fetch the latest data, and if we get a response, reload all active complications (active complications are those that are displayed on the currently selected watch face).
So this is what we’ll do:
func applicationDidFinishLaunching() {
    NSLog("ExtensionDelegate: applicationDidFinishLaunching()")

    KrakowPiosDataLoader().fetchData { success in
        if success {
            self.reloadActiveComplications()
        }
    }
}
To fetch the data we call the KrakowPiosDataLoader class, and then we reload complications - but only if we have any new data, otherwise there’s no point. It’s a general rule on watchOS that your app should not waste time doing unnecessary work.
To reload complications, we get a list of active complications and ask the shared CLKComplicationServer to reload all of them using reloadTimeline(for:). We could also use a similar method extendTimeline(for:) if we wanted to add new timeline entries after existing ones, but in this case we want to immediately replace whatever was shown before with new, up to date data.
func reloadActiveComplications() {
    let server = CLKComplicationServer.sharedInstance()

    for complication in server.activeComplications ?? [] {
        server.reloadTimeline(for: complication)
    }
}
This will trigger a round of calls to your CLKComplicationDataSource - sometimes a moment later, but usually almost immediately. And now that we have real data, we can get back to the getCurrentTimelineEntry method we wrote earlier and replace the placeholders with the real stuff:
func getCurrentTimelineEntry(
    for complication: CLKComplication,
    withHandler handler: @escaping (CLKComplicationTimelineEntry?) -> Void)
{
    let store = DataStore()
    let entry: CLKComplicationTimelineEntry
    let date: Date
    let valueLabel: String

    if let lastMeasurement = store.lastMeasurementDate, let level = store.currentLevel {
        valueLabel = String(Int(level.rounded()))
        date = lastMeasurement
    } else {
        valueLabel = "--"
        date = Date()
    }

    switch complication.family {
    case .modularSmall:
        let template = CLKComplicationTemplateModularSmallStackText()
        template.line1TextProvider = CLKSimpleTextProvider(text: "PM10")
        template.line2TextProvider = CLKSimpleTextProvider(text: valueLabel)
        entry = CLKComplicationTimelineEntry(date: date, complicationTemplate: template)

    case .circularSmall:
        let template = CLKComplicationTemplateCircularSmallStackText()
        template.line1TextProvider = CLKSimpleTextProvider(text: "PM")
        template.line2TextProvider = CLKSimpleTextProvider(text: valueLabel)
        entry = CLKComplicationTimelineEntry(date: date, complicationTemplate: template)

    default:
        preconditionFailure("Complication family not supported")
    }

    handler(entry)
}
This method can get very long quickly when adding additional families to the switch, so I later refactored it adding a set of “Complication Handler” classes implementing a common protocol, where each class is responsible for returning all possible states for a single complication family.
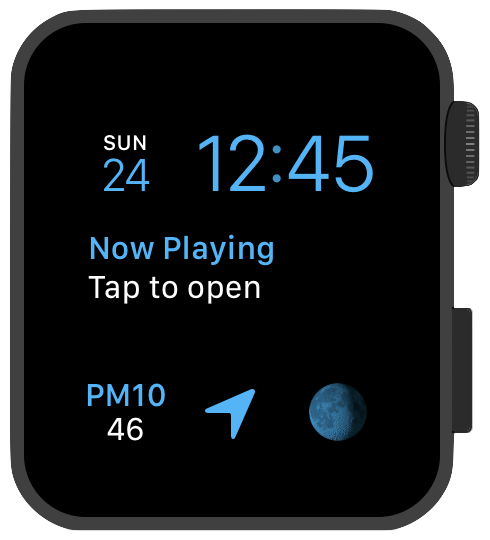
Now, when we run the app and press the home button to get back to the watch face, we see a real value just loaded from the API:
ExtensionDelegate: applicationDidFinishLaunching()
KrakowPiosDataLoader: sending request to http://monitoring.krakow.pios.gov.pl/dane-pomiarowe/pobierz with
query={"viewTypeEntityId": "pm10", "measType": "Auto", "viewType": "Parameter", "dateRange": "Day",
"date": "24.02.2019", "channels": [148]} ...
KrakowPiosDataLoader: received response: 1553 bytes
KrakowPiosDataLoader: saving data: 46.4462 at 2019-02-24 10:00:00 +0000
Scheduling updates
The final missing piece is making sure we can load new data from the API and reload the complication at regular intervals. There are a few scenarios for how you can update the complication:
- you can always do that when your app is in the foreground - but you can’t rely on that happening regularly
- when you receive special silent push notifications, designed specifically for this use case (using the PushKit framework, with
PKPushTypeComplicationtype) - this is useful when your data changes at irregular intervals, when something happens in the outside world - when the iPhone app receives new data in some way and transfers it to the watch
- by scheduling background app refresh at some regular intervals - this is good when you want to pull the data instead of waiting for it to be pushed, like in our case
Note that regardless of the strategy, there are a lot of restrictions on how often we can refresh the data and how much time we can spend doing it (e.g. up to 50 push notifications per day) - if you use up all the time or all available pushes per day, you won’t be able to run in the background for a while (possibly until the next day). There doesn’t seem to be any good way around that, and you shouldn’t try to find one.
Since we know that the city monitoring stations send new measurements every hour, we will use scheduled background refresh to update our complication, and we’ll do that in our ExtensionDelegate.
To ensure our app is called regularly, we need to implement something I call the “background refresh loop”: when the app is launched or restarted, we schedule a background refresh, and then when the app is woken up for background refresh, the first thing we do is schedule the next background refresh, to make sure there’s always a refresh scheduled for some time later.
We’ll always do this at the beginning before other things, because we never know how much time we have and when our app will be suspended (or possibly killed). Otherwise, if the app gets suspended before we set up the next refresh, the app will go to sleep with no alarm set, and… it may oversleep a bit 😉
So let’s take a look at out applicationDidFinishLaunching method again, and we’ll add a call to a new method scheduleNextReload() before the web request is sent:
func applicationDidFinishLaunching() {
    NSLog("ExtensionDelegate: applicationDidFinishLaunching()")

    scheduleNextReload()

    KrakowPiosDataLoader().fetchData { success in
        if success {
            self.reloadActiveComplications()
        }
    }
}
Calculating the next refresh time
We’ll see that method in a moment, but first we need to decide when the next refresh should happen.
In order to optimize the time spent on the background refreshes and make the most of the precious background minutes, it’s important to take a moment and think about when and how often your data will actually change. A great example with a stocks app was mentioned in one talk - the stock exchange only works during its business hours, and outside of that range the stock price won’t change, so it’s pointless to waste time reloading the same unchanged value during the night.
I’ve done some tests on the API I’m loading the data from, and new data points are almost always added around 0-10 minutes after a full hour. So I’ve decided to request a refresh every hour, always at 15 minutes past the hour (10:15, then 11:15, then 12:15 and so on). To do this, we’ll need a helper method to let us find the nearest xx:15 time after current date - luckily, this turns out to be very easy with NSCalendar APIs:
func nextReloadTime(after date: Date) -> Date {
    let calendar = Calendar(identifier: .gregorian)
    let targetMinutes = DateComponents(minute: 15)

    var nextReloadTime = calendar.nextDate(
        after: date,
        matching: targetMinutes,
        matchingPolicy: .nextTime
    )!

    // if it's in less than 5 minutes, then skip this one and try next hour
    if nextReloadTime.timeIntervalSince(date) < 5 * 60 {
        nextReloadTime.addTimeInterval(3600)
    }

    return nextReloadTime
}
Scheduling a background refresh
Finally, to request a background update at the calculated future time, we call scheduleBackgroundRefresh on the WKExtension (the equivalent of UIApplication):
func scheduleNextReload() {
    let targetDate = nextReloadTime(after: Date())

    NSLog("ExtensionDelegate: scheduling next update at %@", "\(targetDate)")

    WKExtension.shared().scheduleBackgroundRefresh(
        withPreferredDate: targetDate,
        userInfo: nil,
        scheduledCompletion: { _ in }
    )
}
The date you pass is the time when you want your app to be woken up. Of course the system only treats it as a hint - when and if your app will be woken up might depend on various factors like (I’m guessing) battery level / charging status, network access, how often you request the refreshes and how much time you spend on each, and so on. So don’t assume your app will actually run at the intervals you want it to run at.
However, based on my tests, in practice an app with an active complication that requests hourly updates runs very regularly every hour, usually within 10 minutes of the requested time, at least during the day and with a network connection. It’s not as good during the night when charging, or when the app wants to run a few times per hour. Also an app that’s in the dock but doesn’t have a complication might not always get called, and an app without a complication and not in the dock will just not get called at all.
The scheduledCompletion block is described in the docs as “A block that is called by the system after the background app refresh task has completed”, but it reality is actually runs immediately right after the next refresh is successfully scheduled - which honestly makes it kind of useless, but unfortunately it’s not an optional argument, and you have to provide at least an empty block. As for userInfo, it can be used to pass some metadata to the background task handler, but we don’t need that here.
Handling background tasks
Background refresh on watchOS is done by waking up your app in the background at various moments and calling the delegate method handle(_ backgroundTasks:), passing it one or more “background tasks” depending on the context. This method is crucial for anything that happens in your app in the background, and you will almost certainly need to do something here regardless of what kind of app you’re building.
There are a few types of those tasks, and you’re supposed to only do the kind of work that’s relevant to a given task when you receive one. There are tasks for handling incoming data from a URL session or from the iPhone, or handling Siri shortcuts, but the one we will use now - the one triggered by an earlier call to scheduleBackgroundRefresh - is the most generic WKApplicationRefreshBackgroundTask. This task just means that your app was woken up because you requested it so that you can run some background URL requests, update your complication and so on.
When the app is woken up in the background as we asked, in handle(_ backgroundTasks:) we do basically the same thing as on startup - we schedule the next refresh and try to update our data. We only use the WKApplicationRefreshBackgroundTask and ignore the others - however, it’s extremely important to always call the setTaskCompletedWithSnapshot() method after you’re done with a task, even for those you skip and don’t handle in your app. Calling this method will mean we’re done though, and our app may get suspended, so we only call it at the end of the callback block, after the response arrives and we process it:
func handle(_ backgroundTasks: Set<WKRefreshBackgroundTask>) {
    for task in backgroundTasks {
        switch task {
        case let backgroundTask as WKApplicationRefreshBackgroundTask:
            NSLog("ExtensionDelegate: handling WKApplicationRefreshBackgroundTask")

            scheduleNextReload()

            KrakowPiosDataLoader().fetchData { success in
                if success {
                    self.reloadActiveComplications()
                }

                NSLog("ExtensionDelegate: completed WKApplicationRefreshBackgroundTask")
                backgroundTask.setTaskCompletedWithSnapshot(false)
            }

        default:
            task.setTaskCompletedWithSnapshot(false)
        }
    }
}
It’s sometimes kind of tricky to get the watchOS simulator to run an app refresh background task, even if you schedule it for a moment later - if you want to test this and it doesn’t run, try switching between apps, the launcher screen and the watch face at random until something works.
Summary
That’s it - we’re done! 🎉 We have an app that will get called every hour, load new data from the web API and display it on your chosen watch face so that you can see it immediately when you raise your wrist.
I think this is the bare minimum of work you need to do to build an app with a complication like this:
- Decide what is the most important thing your app does that you want to show on your complication.
- Decide when your complication content should change and what points and in what places you’ll have on your timeline (this might sometimes not be as obvious as it seems).
- Go through the list of complication families and for each family look at the available templates and decide which one suits you the most.
- Implement the code that loads the required data from a web or system API.
- Implement the required methods in the complication data source to build
CLKComplicationTimelineEntryandCLKComplicationTemplateobjects displaying your content in an appropriate way. - Ensure your app is regularly updated, either using scheduled background refresh or through push notifications (and analyze the patterns of when your data changes in order to optimize how you use the background time).
- Test, test, and test, in any scenario and combination you can think of 🙂
This gets simpler if you want to build a static complication that never updates like Apple’s “launcher” type complications for Breathe, Maps, Reminders etc. - in this case, you’ll only need to:
- Pick an icon you’ll use on all supported complications.
- Implement the data source methods to return single-entry timelines using appropriate “single icon” templates.
In that case you don’t need to schedule background refresh to update the complication, since it will never change. But then you probably need a real app UI that the complication will link to, and that might be a lot more work 😉
You can find all the code for my project in this repo: https://github.com/mackuba/SmogWatch (see the master branch for the latest version, or the post2 branch for a version from this article). It’s WTFPL-licensed, so take what you need from it and build your own cool stuff with it. And let me know if you manage to build something!
Next post: #3 Building the App UI >
1) I’ve finally switched to OSLog in September 2020, you can see it in the version on master or in this diff. ↩︎
12 comments:
trashcancoder
Thx a lot. Very confusing.
bob
This is sooo helpful. Thank you!
Marco
Great article, many thanks!
I have just one question: how do you managed to get reliable background app refreshs? On my Apple Watch only app the background refresh only works once or twice, if I’m lucky, and than it completely stopes to call the handle(_ backgroundTasks) method. I don’t know what I’m doing wrong.
Do you have any idea or workaround to get more information why the background task is not called, or have an idea how to debug it, if the Apple Watch (iPhone) is not connected to the Mac all the time, or any idea how to get more reliable background app refreshes?
Many thanks in advance!
Kuba • mackuba.eu
Hi Marco,
the refresh was working for me almost always during the day, unless the app was killed for some reason. It didn't always work during the night when on charger.
Try checking such things: 1) Are you always scheduling the next refresh, in every case? 2) Does the app crash or get killed by the system? 3) How much time does the app spend during each refresh? (15s seems to be the hard limit)
I'm assuming you have a complication on the screen - the refresh isn't run if there's no complication and the app is not in the app switcher.
For crashes, sync your iPhone with iTunes and then see Window -> Devices -> iPhone -> View Device Logs -> All Logs. Sometimes you need to run "Copy Watch Analytics" in the "Watch" app on the iPhone first.
To have more insight into what's happening, log everything you can with NSLog and install the sysdiagnose profile on the watch, from here: https://developer.apple.com/bug-reporting/profiles-and-logs/?platform=watchos (it disappears after 72 hours). Then you take a sysdiagnose on the watch by holding both buttons (it should make a buzz), and ~10-15 min later you sync the phone to iTunes again, and the sysdiagnose file should be somewhere deep inside ~/Library/Logs/CrashReporter. From there you can open the contents in Console.app and see what was going on with your app during that time (look for your app's name or "Swift", and make sure to change the time range which is "Last 5 min" by default).
Marco
Hi Kuba,
thank you very much for your help.
I finally found the logs...
But I didn't figured out why my background app refresh is not working.
I have observed that the background app refresh is working fine, as long as my iPhone and Apple Watch are in the same Network like my MacBook (development device), but I don't know, why it doesn't work otherwise.
I will let you know as soon as I find any solution.
Kamil
Hi Marco,
I've experienced exactly the same thing as you. On Simulator it works, on paired device in debug mode as well. Once disconnected it hasn't worked a single time.
Have you found solution to this already?
Marco
Hi Kamil,
unfortunately I don’t found a solution yet, but I have some new findings.
For me, the issue appears under the following circumstances:
The background app refresh works totally fine if my iPhone and my Apple Watch are in the same wireless network. If they are in the same wireless network the background app refresh even works with a low battery level of the Apple Watch.
As soon as one of the device is no longer connected to the wireless network, the background app refresh stops working almost immediately.
If they are in the same wireless network again, the background app refresh starts working as well, as long as both device in the same wireless network.
I tried it with different networks, always the same behavior.
For me it is the pattern, iPhone and Apple Watch in the same wireless Network -> Background App Refresh works perfectly without any issue, if they are not in the same wireless network (for example the iPhone is not, but the Apple Watch is connected) -> Background App Refresh doesn’t work at all, no matters what I do.
Do you have the same behavior?
Sorry for my late answer, is there any possibility to get something like a subscription for the comments on this article?
Marco
In addition to my last comment:
In addition to my last comment:
If I talk about Wireless Network of the iPhone, I'm always talk about the WIFI Network, so Wireless Network = WIFI (I don't talk about the mobile Network like LTE/4g)
Furthermore I noticed, that the correct function if the Background App Refresh depends only on the WIFI connection of the iPhone. The WIFI connection of the Apple Watch does not matter at all.
Therefore I have the following behaviour:
If the iPhone is connected to any WIFI Network, the Background App Refresh of the Apple Watch only App is working perfectly
If the iPhone is not connected to any WIFI Network, the Background App Refresh of the Apple Watch only App stops working completely.
Kuba • mackuba.eu
Hey Marco, as for subscribing to comments - I've been planning to add that for a long time, I see how it would be useful in cases like this (also some basic threading), but I still didn't get around to doing it… Maybe now with the whole quarantine thing, this sounds like a good idea for something to get busy with to get my mind off all the worries :)
Song
Thank you, Kuba.
This is such a great tutorial with very detailed guidance and explanations.
I used your example to build my onw watch only app that collect health data and send it to other server using background refresh.
I am sure I cannot make it without your blog posts!
Have a great day!
Kuba • mackuba.eu
@Song Great to hear that! Good luck with your app :)
Brendan
hi there,
I'm not sure what to do when the watch is rebooted. My app is woken to get a complication, but I want to schedule the next background refresh using scheduleBackgroundRefreshWithPreferredDate. However, nothing in the ExtensionDelegate is called at this time, and so I don't know how to make sure a background refresh is scheduled. Do you know a solution to this issue?
thanks!