WatchKit Adventure #4: Tables and Navigation
Two weeks ago I posted the first part of a tutorial about how to build an Apple Watch app UI using WatchKit, using a WKInterfaceController and a storyboard. We’ve built the main screen for the SmogWatch app, showing a big colored circle with the PM10 value inside and a chart showing data from the last few hours.
Here’s the second part: today we’re going to add a second screen that lets the user choose which station they want to load the data from. So far I’ve used a hardcoded ID of the station that’s closest to me, but there are 8 stations within Krakow and the system includes a total of 20 in the region, so it would be nice to be able to choose a different one.
(I initially wanted to also include a selection of the measured pollutant - from things like sulphur oxides, nitrogen oxides, benzene etc. - and I’ve actually mostly implemented it, but that turned out to be way more complex than I thought, so I dropped this idea.)
The starting point of the code (where the previous part ends) is available here.
Preparing the data
Since the list of stations doesn’t change often, we can hardcode a list of stations with their names, locations and IDs in a plist file that we’ll bundle inside the app. The list is generated using a Ruby script, in case it needs to be updated later - you can just download the plist and add it to the Xcode project.
At runtime, the list will be available in the DataStore:
struct Station: Codable {
    let channelId: Int
    let name: String
    let lat: Double
    let lng: Double
}

class DataStore {
    // ...

    lazy private(set) var stations: [Station] = loadStations()

    private func loadStations() -> [Station] {
        let stationsFile = Bundle.main.url(forResource: "Stations", withExtension: "plist")!
        let data = try! Data(contentsOf: stationsFile)

        return try! PropertyListDecoder().decode([Station].self, from: data)
    }
}
Handling secondary screens
When we want to add an additional screen to the app that shows some secondary information or less commonly used feature like this, there are generally three ways we can handle it:
- we can add an explicit button somewhere on the screen that opens it (usually in the bottom part)
- we can put it on another page in the page-based layout (e.g. like sharing and awards in the Activity app)
- or we can put it as an action in the menu accessed through Force Touch
The third option (Force Touch menus) is going away now. In the watchOS 7 betas, Apple has removed all Force Touch interactions from the OS and their own apps, the APIs for using it in third party apps (addMenuItem in WKInterfaceController) are deprecated, and it’s highly likely that the upcoming Series 6 watch will not include it as a hardware feature.
Hiding some actions in a menu had the advantage that it didn’t clutter the main view, but it also made those actions less discoverable and harder to use for those who need them. I personally always had a problem with the Force Touch menus in that I rarely remembered that they exist, and I often not realized that an app had some extra features if it put them there… So I guess it’s for the better, although it will probably take some time to adjust.
Using a page view controller and putting settings on the second page could work, but it doesn’t feel to me like this feature is important enough to get its whole new section in the main app navigation. I don’t think this is something people will do often - normally they should just select a station close to their home and never change it again. There will probably be some users who might want to often switch between stations to compare the values, but that would rather be a minority. (If you do want to use a page view controller, adding it is kind of unintuitive: there is no “Page View Controller” in the library, but instead you drag a segue from the first screen to the second and choose “Next page”.)
So I’ve decided that in this case it’s not a problem to have an additional button at the bottom of the main screen, which opens the list in a separate view.
The second choice is how to show the screen: do we show it as a modal, or push it onto the navigation stack (the latter only possible if we aren’t using a page-based layout)? Again, both could work and it’s mostly a matter of preference. But I think in this case a pushed view integrates better with the rest of the app.
Opening the list view
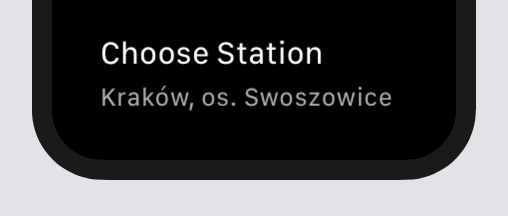
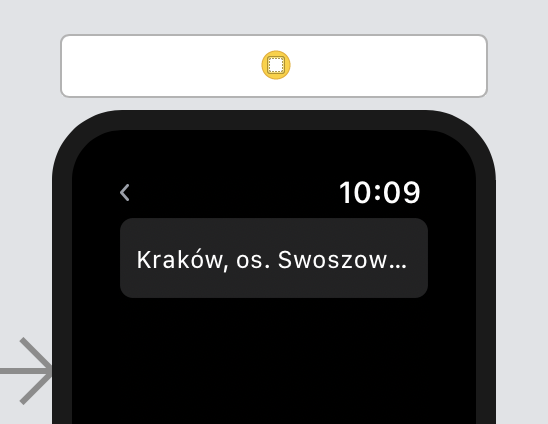
So let’s look at the storyboard again. We’d like to have a button below the chart that looks like a single table cell, which says “Choose Station” and shows the current station below, and opens a selection dialog when pressed.
In WatchKit, buttons work in an interesting way: a button can show a text or an image as its title, but it can also include… a group, which itself can contain any structure you want, however complex. You could even wrap the whole screen in one group which acts as a button if you want (though I’m not sure what happens if you put a button into a group in a button - it might be like when you type Google into Google…). By the way, SwiftUI, which started its life on watchOS, kind of took over this idea - the Button takes a closure that returns its label and you can also put almost anything there.
So let’s add a button at the bottom of the view here, and change its Content type to Group. The group is horizontal by default, so change its Layout to Vertical. Next, drag two labels inside: a top label “Choose Station”, with a Body font, and a bottom label that shows the name of a station, with a Footnote font and Light Gray color. Like on iOS, you can also configure labels so that they’re able to shrink if the text is too long - lower the Min Scale slightly to 0.9, since the station names are kind of long.
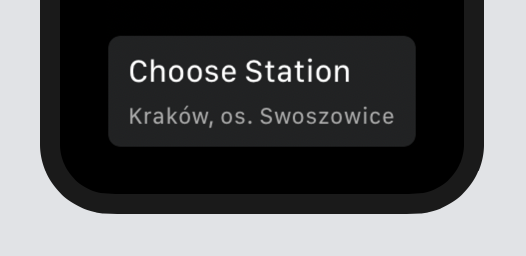
Notice that while a button normally has a dark gray background by default when showing a text, it lost the background when we switched it into the group mode. I’d like it to look like the standard buttons used e.g. in the Settings app’s various dialogs, but I don’t think there is any way to restore this default shape and color other than trying to manually recreate it. (Technically, we could probably implement it as a one-row table instead… but that would be too much extra work.)
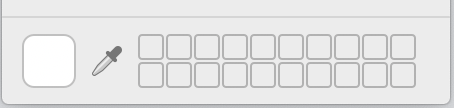
So here’s how we’ll do it: add another plain button to the view. Select the new group, open the select field for the Color property (not Background - that’s used when you have an image background) and choose “Custom”. Now, in the system color picker use the “eyedropper” tool at the bottom to read the color value from the standard button:
Now you can delete the plain button. Let’s also give the group button custom insets to have some padding around the text: 8 on the top, bottom and right, and 10 on the left. And connect the lower label to an outlet in the InterfaceController, since we’re going to need it later:
@IBOutlet var stationNameLabel: WKInterfaceLabel!
Pushing the list view
Now, we’re going to add a second screen to our app. Drag a new interface controller from the library and put it on the storyboard on the right side of the main screen. Then, drag a segue from the button to the new screen - you’ll probably have to use the element sidebar on the left, since if you drag from the button’s rendering in the scene, it selects the group and not its parent button. Select the “Push” segue type (for a modal, you’d do it the same way, but with a “Modal” type segue instead).
Alternatively, we could leave the new screen disconnected, assign it an identifier, and then open the screen manually in code using the pushController(withName:context:) method, or presentController(withName:context:) in case of a modal, from the IBAction triggered from the button. But this sounds like more work, and I generally like to use segues whenever possible, since the storyboard then shows a clearer picture of the whole flow of the app.
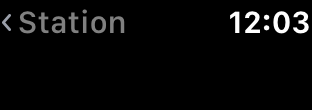
The pushed view shows a “<” back button at the top, and you can put a title there. However, these titles work differently than on iOS: on iOS, you usually have a “< Back” button on the left, and a title in the center. On the Watch, there isn’t enough space for that - so the title shown after the “<” sign is supposed to be the name of the current view, not the view that you can get back to.
In this case, let’s make it say simply “Station”, since “Choose Station” is a bit too long (you need to leave space for the clock on the right). You can type it into the Title field, or just double-click the top area where the title should be (though it won’t be displayed on the storyboard).
Designing table cells
To display a list of things from which you can select one, the obvious choice is a table view. On watchOS it works somewhat similarly to iOS, with some exceptions - there are no sections, there’s only one single section of cells (although you could simulate sections by making different cells that act as section headers). But like on iOS, you use custom classes to handle the cells - like UITableViewCell, here they’re called “Row Controllers”; cells also have identifiers, and you can use different kinds of cells in one table.
To start, drag a table from the library into the second view. You automatically get one standard row type created for you, but you can add more.
Add a label to the table row’s group, use a standard Body font, but set Min Scale to 0.8 to accomodate longer names. By default the label will put itself in the top-left corner, so set its Vertical Alignment to center.
We need one more thing though: it would be nice to show a checkmark symbol on the right when you select a cell - just like in the Settings app:
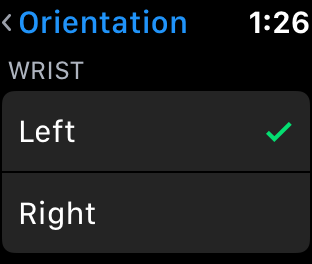
Unfortunately, there doesn’t seem to be any equivalent of UITableViewCell.AccessoryType here - if you want to have a checkmark, you need to add it manually as a normal label.
So, add another label to the same row group, set its title to the unicode symbol “✓” (which looks very similar to the checkmark in the settings), and “borrow” the green color from the system checkmark in the Settings using the same eyedropper method as before. Set its Vertical Alignment to center too.
We have one problem though: the first label takes all available space, and the checkmark is pushed to the edge:
Sadly, there are no “compression priorities” here like in AutoLayout, so there’s no way to tell WatchKit to give the checkmark all the space it needs and then leave the rest to the title. What we can do instead is assign the checkmark a Fixed width which is then enforced - 15 seems about right; it’s not an elegant solution, but it works. Set also its internal Alignment (the text alignment, in the Label section, not the position alignment) to right so that the symbol stays at the right edge, even if we gave it too much space.

Handling the channel ID
Let’s look at our data & networking code for a moment. When the user picks a station, we’re going to store the channel ID in the DataStore. We also need to make sure that when the channel ID is changed, the old data is reset, because it was loaded from another station so it’s no longer relevant:
private let selectedChannelIdKey = "SelectedChannelId"

class DataStore {
    // ...

    var selectedChannelId: Int? {
        get {
            return defaults.object(forKey: selectedChannelIdKey) as? Int
        }
        set {
            if newValue != selectedChannelId {
                defaults.set(newValue, forKey: selectedChannelIdKey)
                invalidateData()
            }
        }
    }

    func invalidateData() {
        defaults.removeObject(forKey: savedPointsKey)
        defaults.removeObject(forKey: lastUpdateDateKey)
    }
}
We also need to actually use the new channel ID when making the request for the data. This is a bit too long to paste here, so here’s the relevant change in the KrakowPiosDataLoader class. Instead of the hardcoded ID of one specific station that I’ve used before, we’ll now be passing the ID of the selected station to the query.
The table controller
We’ll handle the table view in code in a new interface controller, which we’ll call StationListController. Create such class in Xcode (inherit from WKInterfaceController - there’s no special “table view controller”) and assign it to the new scene on the storyboard. Also add this outlet and connect it:
@IBOutlet weak var table: WKInterfaceTable!
We’ll also need a row controller class (it’s required, and there is no default base class with standard outlets like UITableViewCell that we could use anyway). Use NSObject as the base class and call it StationListRow - like table view cells, it will be very simple:
class StationListRow: NSObject {
    @IBOutlet weak var titleLabel: WKInterfaceLabel!
    @IBOutlet weak var checkmark: WKInterfaceLabel!

    func showStation(_ station: Station) {
        titleLabel.setText(station.name)
        checkmark.setHidden(true)
    }

    func setCheckmarkVisible(_ visible: Bool) {
        checkmark.setHidden(!visible)
    }
}
Assign the class name to the row on the storyboard and connect the outlets. A row also needs an identifier - call it BasicListRow (yes, there will be another :).
Now, in the StationListController, the interesting stuff happens in the awake(withContext:) method. What is a context, you might ask? It’s a cool idea that Apple kind of expanded on in the iOS 13 SDK, in the form of UIStoryboard.instantiateViewController, which lets you have a custom initializer in a UIViewController in which you can receive any required data, while still using storyboards and segues to navigate to the view controller.
In WatchKit, instead of custom initializers you have a single context object - but this context could be anything you want, including any complex structure and non-ObjC types. You can use this object to pass all required data from the parent/presenting controller to the presented controller, and extract it in awake(withContext:).
We’ll use the context to pass the new view controller the list of all stations and the id of the currently selected one (if any). And it turns out that it’s also possible to pass blocks this way, so we can include a simple block that will act as a selection callback - this way we can avoid building a “delegate protocol” to pass the response back.
Let’s prepare a simple struct for the context data:
struct StationListContext {
    let items: [Station]
    let selectedId: Int?
    let onSelect: ((Station) -> ())
}
The selection controller will get this data from the main interface controller, which assigns it in the contextForSegue(withIdentifier:) method:
override func contextForSegue(withIdentifier segueIdentifier: String) -> Any? {
    if segueIdentifier == "ChooseStation" {
        return StationListContext(
            items: dataStore.stations,
            selectedId: dataStore.selectedChannelId,
            onSelect: { _ in }
        )
    }

    return nil
}
For this to work, you need to select the segue on the storyboard and assign it the identifier ChooseStation.
In the StationListController, we’ll receive the data from the context in awake(withContext:):
class StationListController: WKInterfaceController {
    var selectedRowIndex: Int? = nil
    var items: [Station] = []
    var selectionHandler: ((Station) -> ())?

    override func awake(withContext context: Any?) {
        let context = context as! StationListContext

        items = context.items
        selectionHandler = context.onSelect
        ...
Notice that we don’t need to call super() in awake(withContext:) - the same is true for willActivate, didAppear etc. If you look at the documentation of those, it always says “The super implementation of this method does nothing” there.
To initialize the table, we call the setNumberOfRows method to set the row count, and then we iterate over the rows to initialize their contents (there is no “cell reuse” and initializing cells during scrolling, it’s all done up front). If you wanted to have multiple types of rows in one table, then you need to call setRowTypes instead and pass it an array with as many repeated identifiers as you want to have rows.
table.setNumberOfRows(items.count, withRowType: "BasicListRow")

for i in 0..<items.count {
    let row = table.rowController(at: i) as! StationListRow
    row.showStation(items[i])
}
We’ll also preselect the row of the currently selected station, if we can find it (we pass the channel ID from the parent controller, but here we’ll store the index of the row, so that we can later deselect it easily).
if context.selectedId != nil {
    if let index = items.firstIndex(where: { $0.channelId == context.selectedId }) {
        let row = table.rowController(at: index) as! StationListRow
        row.setCheckmarkVisible(true)
        selectedRowIndex = index
    }
}
To handle row selection, we’ll implement table(_:didSelectRowAt:) (you don’t need to assign any delegate/data source properties to the table or add any protocols, it works automatically):
override func table(_ table: WKInterfaceTable, didSelectRowAt rowIndex: Int) {
    if let previous = selectedRowIndex, previous != rowIndex {
        listRowController(at: previous).setCheckmarkVisible(false)
    }

    listRowController(at: rowIndex).setCheckmarkVisible(true)
    selectedRowIndex = rowIndex

    selectionHandler?(items[rowIndex])
}

func listRowController(at index: Int) -> StationListRow {
    return table.rowController(at: index) as! StationListRow
}
As you can see: we manually hide the checkmark in the previously selected row whose index we’ve saved, we show the checkmark on the current row, we store the row index, and we pass the Station back through the callback block.
Finally, we need to handle the selection in the parent controller when the callback is called. Specifically, we’ll need to:
- save the channel ID of the new station in the
DataStore, so that further requests to the web service will load data from that station - update the displayed station ID in the button at the bottom
- show in the UI that we have no data from that station yet
- request to reload the data immediately
Here’s how we do it:
func setSelectedStation(_ station: Station) {
    dataStore.selectedChannelId = station.channelId
    stationNameLabel.setText(station.name)

    updateDisplayedData()
    gradeLabel.setText("Loading")

    KrakowPiosDataLoader().fetchData { success in
        self.updateDisplayedData()
    }
}
And remember to call this in the callback block from StationListContext:
return StationListContext(
items: dataStore.stations,
selectedId: dataStore.selectedChannelId,
onSelect: { station in
self.setSelectedStation(station)
}
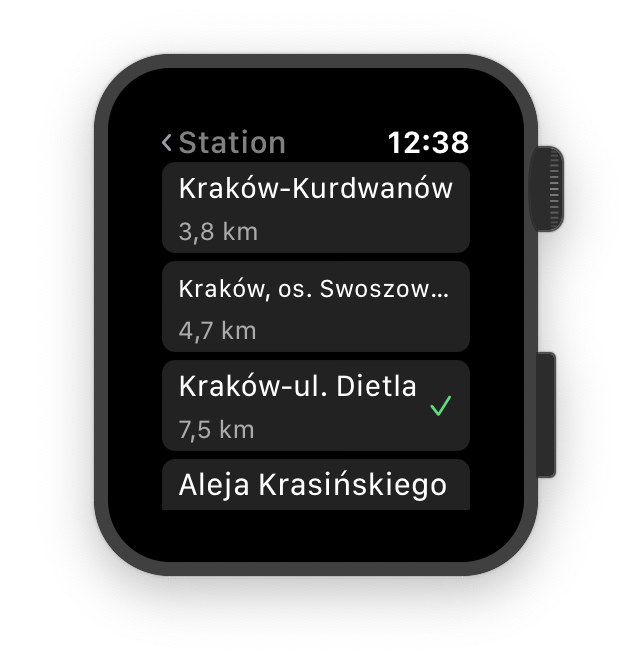
)
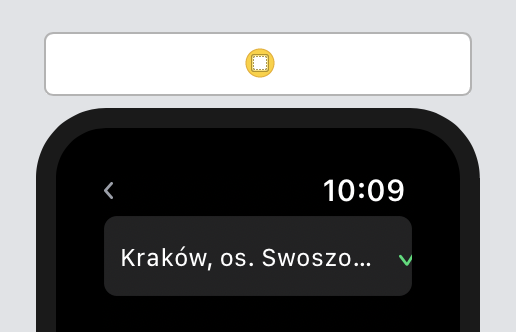
The end result should look like this 🙂
And one more thing: we need to also remember to initialize the selected station label when the view is first loaded. We’ll make it say “not selected” if nothing was selected yet:
// call in awake(withContext:)

func updateStationInfo() {
    guard let channelId = dataStore.selectedChannelId else { return }

    if let station = dataStore.stations.first(where: { $0.channelId == channelId }) {
        stationNameLabel.setText(station.name)
    } else {
        stationNameLabel.setText("not selected")
    }
}
User location
There’s still something we could do to improve the user experience: why ask the user which station they want to load the data from, when in the majority of cases they’ll only be interested in the one that’s closest to them? And why make them scroll through the whole list, if some of the stations are 100 km away from them?
We can solve this if we ask the user for location access - after all, almost every Apple Watch has built-in GPS, and those that don’t are connected to an iPhone that has one.
On watchOS we ask for location exactly like on iOS - so we can follow the instructions I wrote here a few years ago:
- add an
NSLocationWhenInUseUsageDescriptionkey to theInfo.plist(e.g. “SmogWatch uses location data to pick a station that’s closest to you.”) - add a reference to a
CLLocationManagerin theInterfaceControllerand make it its delegate - ask for location access when the main screen opens:
var userLocation: CLLocation?

override func willActivate() {
    askForLocationIfNeeded()
}

func askForLocationIfNeeded() {
    guard userLocation == nil, CLLocationManager.locationServicesEnabled() else { return }

    switch CLLocationManager.authorizationStatus() {
    case .notDetermined:
        locationManager.requestWhenInUseAuthorization()
    case .authorizedAlways, .authorizedWhenInUse:
        locationManager.requestLocation()
    default:
        break
    }
}
We’re going to store the location in userLocation when we find it, so that we can use it in the station selection screen.
⚠️ One warning here - I initially added askForLocationIfNeeded() to didAppear so that we only ask for location once the UI appears, and I was expecting didAppear to always be called following willActivate - but it doesn’t seem to work this way. From my testing right now, it seems that didAppear is only called when the app is launched and when you return to the interface controller from the pushed view, but not when the app is closed and reopened. If you add something to one of these two methods, make sure you test exactly in which cases they get called.
Next, if the user grants us location access after the launch, we ask for location data then:
func locationManager(
  _ manager: CLLocationManager,
  didChangeAuthorization status: CLAuthorizationStatus)
{
    switch CLLocationManager.authorizationStatus() {
    case .authorizedAlways, .authorizedWhenInUse:
        locationManager.requestLocation()
    default:
        break
    }
}
We only ask for a single location, we don’t need to track it continuously. And we can also set desiredAccuracy to kCLLocationAccuracyHundredMeters when setting up the CLLocationManager - we won’t need more precision than that, and we should get the location much faster this way.
When we get the location, we save it in the property userLocation mentioned earlier (we also need to handle an error case - you actually get an exception immediately if you don’t). Also, most importantly, if there is no station selected yet, but we have the user location, we can preselect the closest one automatically - that way, the user will see some data almost immediately, without having to configure the app first, and it’s very likely it will be exactly the data that they want 👍
func locationManager(_ manager: CLLocationManager, didUpdateLocations locations: [CLLocation]) {
    guard let currentLocation = locations.last else { return }

    userLocation = currentLocation

    if dataStore.selectedChannelId == nil {
        let closestStation = stationsSortedByDistance(from: currentLocation).first!
        setSelectedStation(closestStation)
    }
}

func locationManager(_ manager: CLLocationManager, didFailWithError error: Error) {
    NSLog("CLLocationManager error: %@", "\(error)")
}

func stationsSortedByDistance(from userLocation: CLLocation) -> [Station] {
    return dataStore.stations.sorted { (s1, s2) -> Bool in
        let d1 = CLLocation(latitude: s1.lat, longitude: s1.lng).distance(from: userLocation)
        let d2 = CLLocation(latitude: s2.lat, longitude: s2.lng).distance(from: userLocation)

        return d1 < d2
    }
}
We can then pass the saved location to the stations list, where we’ll use it to show the distance to each station, and we can also pass it a list of locations sorted by location:
override func contextForSegue(withIdentifier segueIdentifier: String) -> Any? {
    if segueIdentifier == "ChooseStation" {
        let stations: [Station]

        if let currentLocation = userLocation {
            stations = stationsSortedByDistance(from: currentLocation)
        } else {
            stations = dataStore.stations
        }

        return StationListContext(
            items: stations,
            selectedId: dataStore.selectedChannelId,
            userLocation: userLocation,
            onSelect: { station in
                self.setSelectedStation(station)
            }
        )
    }

    return nil
}
Add a userLocation: CLLocation? property to the SelectionListContext, from which we’ll read it in the controller’s initializer.
Showing distances in the list
Let’s look back on our storyboard again. We want to have a second label below the station title that shows the distance to the station - that is, if we know user’s location, otherwise we show the old version.
It’s possible that we could somehow make this work with a single cell type, but I figured that a much easier way would be to have two different cells managed by the same class. So make a duplicate of our BasicListRow, give it an identifier ListRowWithDistance and keep the same class name.
In order to have 3 elements in the cell positioned correctly, we’re going to need two groups: one horizontal, dividing the checkmark on the right from the two labels on the left, and then an inner vertical group that arranges the two labels. So change the cell this way:
- Wrap the left label in a Vertical group.
- Add a second label inside that inner group. Make sure it’s below the first one (you can set their vertical alignment, or you can just make sure they’re in the right order in the view tree).
- The table row’s main group has a fixed “Default” height configured when created - but with two labels, this default height is too little. So change the height setting to Size to fit.
- Give the lower label a Light Gray color and a Footnote font. Make it say e.g. “3.2 km”, and assign it to an outlet in the
StationListRow:
@IBOutlet weak var distanceLabel: WKInterfaceLabel!
- Give the vertical group Insets of 3 at the top and bottom, and change its Width setting to “Size to fit content” - otherwise it will take whole cell width by default and push the checkmark out.
- Customize the outer (horizontal) group’s Spacing to 0; we can allow less space between the checkmark and the edge of the title label now, because the checkmark will be positioned in the vertical center, so slightly lower than the label.
- The checkmark’s properties should stay as before.
We can then add another helper method to StationListRow to set the distance. We’re going to use MeasurementFormatter here in order to automatically display kilometers or miles, and we’ll also make sure to only print 1 decimal digit, since we asked for a slightly less precise location (the default is something like “2.456 km”):
let measurementFormatter: MeasurementFormatter = {
    let numberFormatter = NumberFormatter()
    numberFormatter.maximumFractionDigits = 1

    let measurementFormatter = MeasurementFormatter()
    measurementFormatter.numberFormatter = numberFormatter
    return measurementFormatter
}()

func setDistance(_ distance: Double) {
    let text = measurementFormatter.string(
        from: Measurement(value: distance, unit: UnitLength.meters)
    )
    distanceLabel.setText(text)
}
And now in the awake(withContext:) method in StationListController we can choose between the two types of cells depending on whether we have the location or not, and if we do, calculate the distance to each station and show it in the lower label:
let rowType = (context.userLocation == nil) ? "BasicListRow" : "ListRowWithDistance"
table.setNumberOfRows(items.count, withRowType: rowType)
for i in 0..<items.count {
let row = listRowController(at: i)
row.showStation(items[i])
if let location = context.userLocation {
let itemLocation = CLLocation(latitude: items[i].lat, longitude: items[i].lng)
row.setDistance(location.distance(from: itemLocation))
}
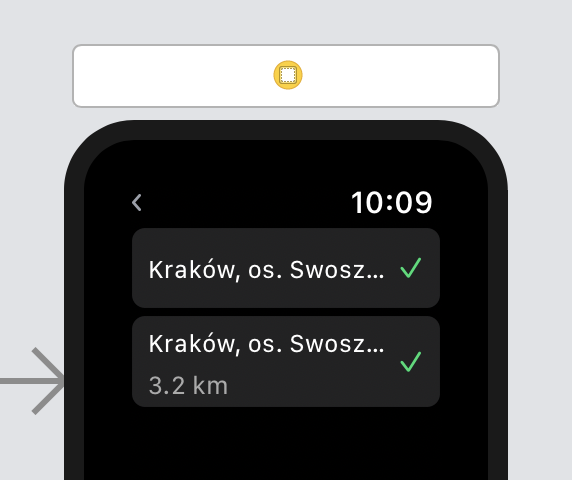
}
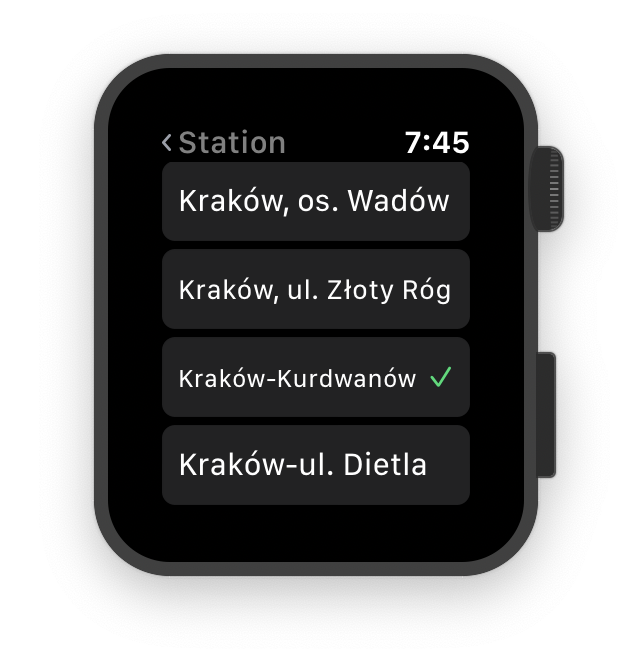
You should now see something like this:
We’ve reached the end of this tutorial. For the next episode, I will try to rewrite the whole UI again from scratch in SwiftUI and compare how much effort it requires to build the same kind of UI in the new framework :)
The final version of the code after a completed tutorial is available on a branch here, and the slightly different real version on the master would be more or less at this commit.