Setting up an HTTPS site on Nginx
This is my SSL configuration guide. There are many like it, but this one is mine…
Last week I needed to set up my first HTTPS site for Hive Mac [link removed - site has been shut down since then], and I went ahead and did the same thing for my new blog domain. It took some figuring out, so I’ve written this all down, if only to save myself some time next time I need to do this.
Update 22.01.2019: I’ve now switched to Let’s Encrypt which makes the whole process much simpler. See “Setting up Let’s Encrypt”, and then jump to “Testing the certificate” when you’re ready.
Choose a Certificate Authority and buy a certificate
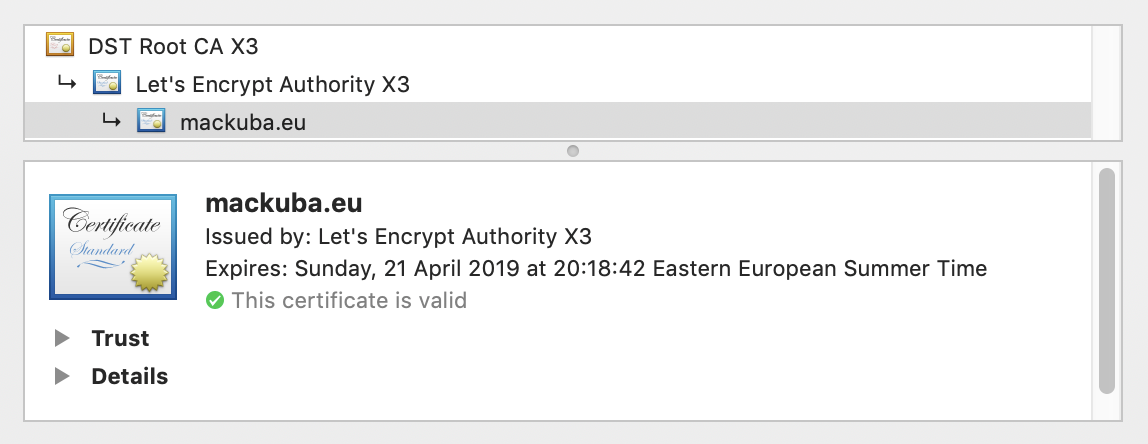
The way the system works is that the certificate you receive when visiting an HTTPS site is verified by another certificate owned by your CA, which might in turn be verified by another certificate higher up, until you reach a root certificate which is supposed to be already installed on your system, like this:
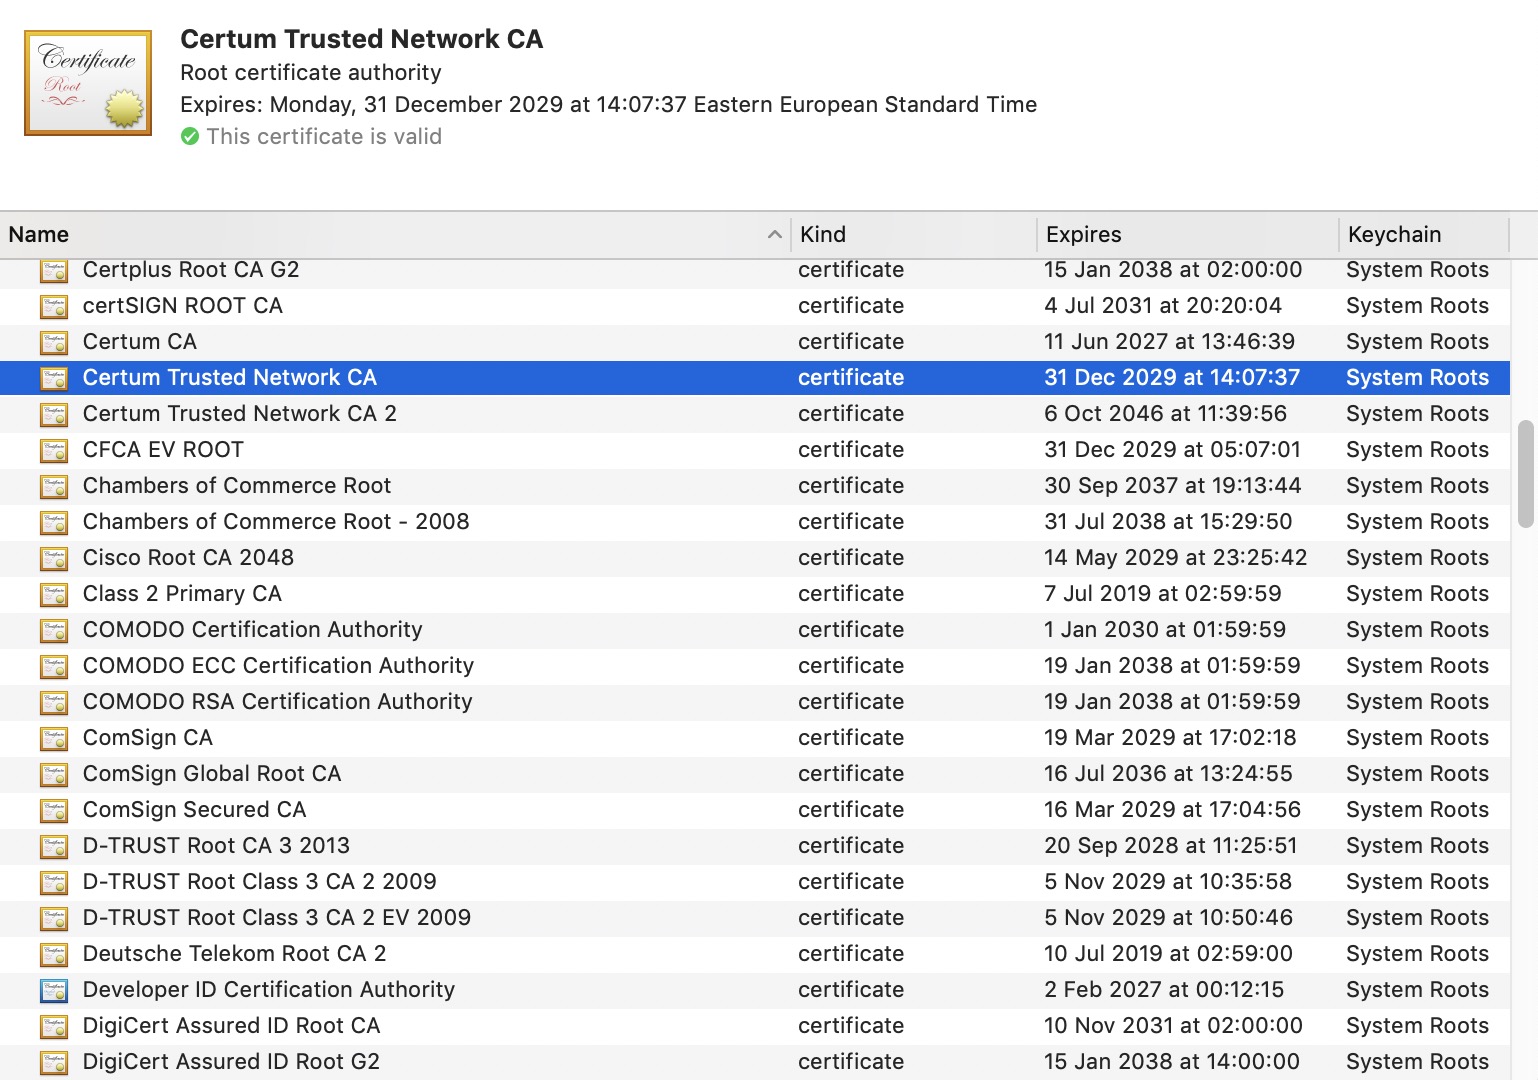
There are many root CAs and you probably have about a hundred of their certificates installed on your OS:
What you need to provide as a server owner is the bottom certificate that belongs to you (which you buy) and all the certificates up the chain (which you can download from the CA’s site) except the one at the top (which the users should already have).
To get your certificate, you need to get it from one of those CAs. They usually cost somewhere between $10 and $100 a year for the most basic one (“Domain Validation”), a couple times more for a wildcard certificate (for *.yourdomain.com) and much, much more for an EV (Extended Verification) certificate - it’s the one that shows the company name in the address bar apart from a lock icon:
![Chrome address bar showing mBank S.A. [PL] before the address](/images/posts/ssl/certs-ev-chrome.png)
Safari doesn’t show the company name there, but it does show a green lock icon:

These are much more expensive, because they require passing very thorough and formal verification to ensure that the company is what they claim to be and that they’re following all required procedures.
However, now it’s also possible to get the certificate for free. Mozilla together with EFF have launched Let’s Encrypt, a new CA free for everyone that’s meant to help convert the whole web to secure, encrypted HTTPS. I’d strongly recommend switching to Let’s Encrypt, because apart from saving you some money every year, it also provides some tools that automate the whole process. You only need to run some commands once when generating the first certificate (or when you add new domains), and then the certificate automatically renews itself using a cron job every 2 months.
Setting up Let’s Encrypt [2019]
To install and set up Let’s Encrypt, open the Certbot site, select your configuration and follow the instructions there. In case of Nginx on Ubuntu, you’ll need to run:
sudo add-apt-repository ppa:certbot/certbot
sudo apt-get update
sudo apt-get install python-certbot-nginx
And then there are a few ways of generating the certificate and updating your config - in the order from most automated to most manual:
1. Use Nginx installer
sudo certbot --nginx -d example.com -d www.example.com ...
You can include several domains in one certificate by adding more -d options. You should probably include at least the www. subdomain. This validates your domain by updating the Nginx config, and also makes any necessary changes to the config to serve your site via HTTPS using the new certificate. (You can rollback the changes with sudo certbot --nginx rollback if something goes horribly wrong.)
2. Use certonly and update the config yourself
sudo certbot --nginx certonly -d example.com ...
This validates your domain by temporarily updating the Nginx config, and then rolls back all changes. You can set up the configuration manually to point to the newly generated certificates.
You should add this to your server block:
ssl_certificate /etc/letsencrypt/live/example.com/fullchain.pem;
ssl_certificate_key /etc/letsencrypt/live/example.com/privkey.pem;
And this to your main http configuration:
include /etc/letsencrypt/options-ssl-nginx.conf;
ssl_dhparam /etc/letsencrypt/ssl-dhparams.pem;
If you prefer, you can also skip the included config and configure SSL options yourself, e.g. to enable TLS 1.3 or disable some older protocols or ciphers. The settings used by Certbot are based on these Mozilla recommendations (“Intermediate” list).
3. Use certonly with –webroot and provide web server paths (* what I used)
sudo certbot certonly --webroot --webroot-path /var/www/example -d example.com ...
This validates your domain by temporarily putting some files in a provided directory so that they can be checked from outside by making an HTTP call to your web server. Use this if you really don’t want Certbot to mess with your Nginx config in any way. If some sites that you list with further -d options are loaded from a different path, add another --webroot-path option before listing them.
4. Use certonly with –standalone
sudo certbot certonly --standalone -d example.com ...
This tells Certbot to run its own server on port 80 or 443 and perform the validation bypassing Nginx completely. However, it needs to be able to reserve that port for itself for a moment, which means Nginx can’t be running there.
5. Use certonly with –manual and do everything yourself
sudo certbot certonly --manual -d example.com ...
This will require you to follow some manual steps as in most normal CAs - put a file somewhere or add a DNS entry, etc.
Using traditional CAs
If for some reason you don’t want to use Let’s Encrypt, you will need to go through a few steps to generate the final certificate once you choose the CA.
Generate a private key
Private key is something that is kept on your server to encrypt all HTTPS communication, and as the name implies, is not supposed to be revealed to anyone. Anyone who has access to it can pose as your site to its visitors.
To generate a key, run this command on the server:
sudo openssl genrsa -out yoursite.key 2048
2048 means that we’re creating a 2048-bit key, which is the recommended length now. Normally the key is kept somewhere in the web server configuration directory, e.g. /etc/nginx/ssl.
You should probably also make sure that only the root can access the key:
sudo chmod 600 yoursite.key
BTW: this article includes a nice list of all relevant OpenSSL commands related to keys, certificates and CSRs that you might need.
Generate a Certificate Signing Request
After (or before) you pay for the certificate, the CA will ask you for a CSR. Some CAs provide web forms that make this easier and create the CSR (together with the private key) for you, but ideally you should also generate the CSR yourself, like this:
sudo openssl req -new -sha256 -key yoursite.key -out yoursite.csr
This command will ask you several questions about your country (two-letter code), city, company name and so on. Some CAs might require all of those to be filled, some might only need the country code (e.g. “PL”) and “common name” (that’s your domain name, e.g. “yoursite.com”). If they don’t specify what they require, you can try submitting a CA with only those two things, and then fix it if it’s rejected.
A few tips about the fields:
- if you enter an email, it should probably be in the domain you’re creating the certificate for (e.g. admin@yoursite.com)
- if you’re wondering what to put in the “state or province” field, in Poland it’s e.g. “malopolskie” (lowercase and without diacritics), other countries will have different rules
- if you want to leave a field empty, enter a single dot - just pressing enter will leave the default value which usually doesn’t make sense
- take into account that some or all of the fields from the CSR might end up being visible to the end users in the certificate info:
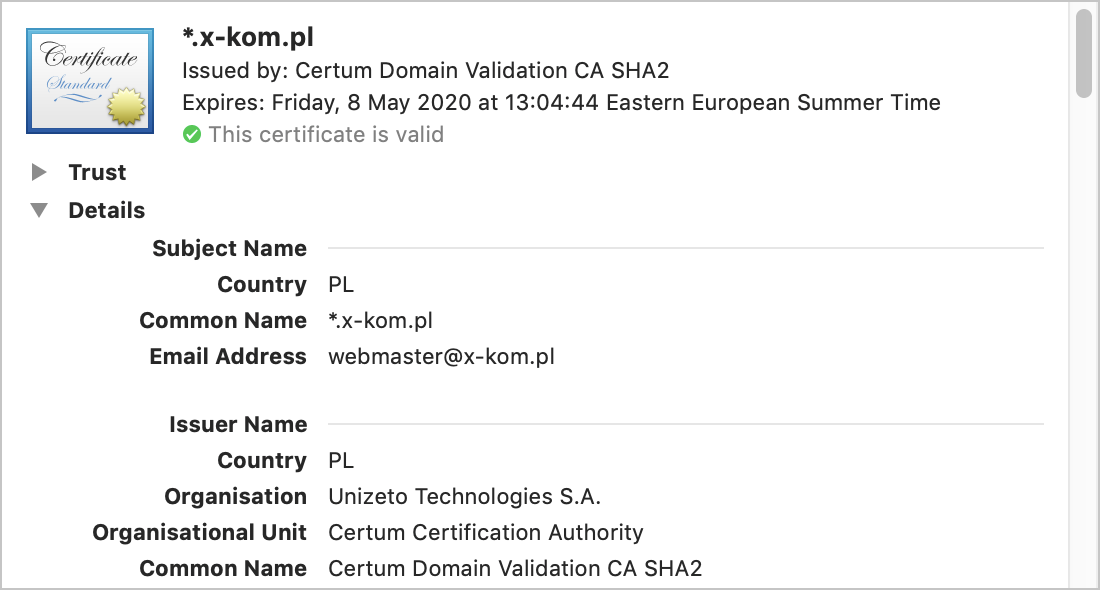
You can display the details of a generated CSR using this command:
openssl req -text -noout -verify -in yoursite.csr
When you’re ready, paste the CSR text into the text field in the web form.
Confirm ownership of the domain
To issue a certificate for the given domain, the CA obviously needs to verify that you actually own the domain and aren’t just trying to hack it.
Depending on the CA, there might be one or more ways to verify that you own the domain:
- uploading a file to the server and making it available through HTTP
- adding a meta tag to a page on your site
- adding a text entry to the DNS records
- receiving an email to an address in that domain
Find out what this specific CA requires you to do and follow the instructions.
Create a certificate bundle
The HTTP server requires a certificate bundle file that includes the entire chain of certificates in the right order. Some CAs might make it available to you directly once you complete the verification, however, some others may require you to do some additional work to put it together.
If you don’t get a file with a complete certificate chain, you will probably instead get a file that includes just your own certificate (the one at the bottom of the chain), and you will need to download the rest separately. It should be either in the same account area where your certificate is, or on some kind of help/support page (since it’s the same for everyone).
Make sure that both of those files are in text (PEM) format (with the BEGIN/END CERTIFICATE tags). If they’re binary files, use this command to convert them:
openssl x509 -inform der -in certificate.der -out certificate.crt
Once you have the two text files, simply concatenate them together into one file; the certificates should be in reverse order, from the bottom to the top, so your own goes first:
cat certificate.crt certumpl-certs.crt > yoursite.crt
Look inside to make sure everything looks right in case e.g. some newlines were missing at the end etc. Then upload the certificate to your server.
You can also show the details of a certificate using openssl:
openssl x509 -text -noout -in yoursite.crt
Configure Nginx
The bare minimum you need to do in your Nginx config is enable SSL and set the location of the private key and certificate bundle:
listen 443 ssl;
ssl_certificate /etc/nginx/ssl/yoursite.crt;
ssl_certificate_key /etc/nginx/ssl/yoursite.key;
This can be either in the same server block as the HTTP version of your site, if you want to share all the settings, or (usually) in a separate server block.
You should also make sure that the server is configured to use the right protocols and ciphers. A good idea is to use the list recommended by Mozilla (“Intermediate compatibility”). You’ll definitely want to make sure that SSLv3 (enabled by default) is disabled, since it has some vulnerabilities.
It should look more or less like this:
ssl_protocols TLSv1 TLSv1.1 TLSv1.2;
ssl_ciphers .........;
ssl_prefer_server_ciphers on;
In general, it might be good to read the whole “Configuring HTTPS servers” and “Module ngx_http_ssl_module” doc pages on the Nginx site.
You should also consider tweaking some performance settings. I won’t pretend I know exactly what the right settings are, but this seems to be the most often recommended setup:
ssl_session_timeout 10m;
ssl_session_cache shared:SSL:10m;
And something not specific to Nginx, but just as important: remember to enable the HTTPS port (TCP 443) on your firewall :)
DHE parameters file
If you use the Mozilla cipher list linked above, then some of the ciphers will require an additional “dhparam” file with some large numbers used by the cipher algorithm when establishing connection (see the Mozilla wiki page again for more info). It will work without one, but then it will use default values which aren’t good enough anymore (as of this week, SSLLabs marks the 1024-bit version of those ciphers as “Weak”).
To fix that, you need to do two additional things:
1) Generate a 2048-bit dhparam file using OpenSSL (it took about a minute on my VPS):
sudo openssl dhparam -out dhparam.pem 2048
2) Tell Nginx to use it:
ssl_dhparam /etc/nginx/ssl/dhparam.pem;
Testing the certificate
The basic test is to just open your HTTPS site in a browser. If it works, you don’t get any alerts, you see a lock icon and no warnings in the certificate details panel, then you should be good. If not, you’ll need to debug the problem.
The SSL Labs Server Test tool is a great way to test everything in your SSL certificate and setup. It might not tell you exactly what to do, but if anything is wrong, it will find it.
You can also use this openssl command:
openssl s_client -connect yoursite.com:443 -CAfile /usr/local/share/ca-bundle.crt -status
You’ll need to provide a bundle file with the root certificates - if you’ve installed anything from homebrew or macports, it’s quite likely that you have a copy somewhere in /usr. The output from this command will probably be hard to read, but it can also lead you in the right direction if you can’t figure out the problem.
Here are a few errors you can get:
“This server’s certificate chain is incomplete”, “Extra download”, “unable to get local issuer certificate”
Some intermediate certificates are missing from the bundle; you’ve either forgotten to include the shared certificates from the CA, or you’ve downloaded an incorrect version of those (e.g. SHA-1 instead of SHA-2).
“This server accepts the RC4 cipher, which is weak”
Use the cipher list from Mozilla, and make sure the config file is actually included by Nginx.
“The server does not support Forward Secrecy with the reference browsers”
Make sure you include ssl_prefer_server_ciphers on in the Nginx config.
“Incorrect certificate because this client doesn’t support SNI”
This is something that can happen when you have more than one HTTPS server configured on the same IP. Because of how older versions of HTTPS worked, the server couldn’t know which hostname the request was for (and so which certificate it should serve) until after a secure connection was already established. This was usually solved by just using separate IPs.
The problem went away when browsers and servers implemented a new extension called SNI - you shouldn’t normally worry about it unless you need to support e.g. IE 6, Android 2.3 or Windows XP (but if you do, that’s the least of your problems…).
“Contains anchor”
This is just a warning, it means your certificate bundle includes the certificate at the top of the chain, which is not required (since users already have it); simply delete the last CERTIFICATE block from the bundle to fix this.
Fix content warnings
It’s quite likely that at first you will see “mixed content” warnings in the browser when you open your site (open the inspector panel or error console). This means that you need to look for assets (images, scripts, stylesheets) that are included via HTTP and make them use HTTPS (or you can use scheme-less links like //server/host, in which case the right prefix will be added automatically depending on how you access the site).
Redirect to HTTPS
Once you’re sure that everything works, you can move all site configuration to the HTTPS server block and leave a separate HTTP block that simply redirects everyone to the secure site:
server {
  server_name yoursite.com;
  return 301 https://yoursite.com$request_uri;
}
Enable HSTS
When you’re really sure that everything works, you should also make either the server or your webapp send HSTS headers. HSTS is something that tells the browser that it should remember to always access the site only through HTTPS and never try to load the HTTP version, even if you explicitly try to do that. This makes your visitors secure against attackers who might trick them into accessing the plain HTTP version. Even if you have the above redirect enabled, a single request might be enough to leak session cookies and gain access to their accounts if they’re accessing the site through an insecure WiFi.
Once you set this, you can’t remove the HTTPS version anymore, because the users' browsers will have remembered that they should never ever access the HTTP version, and will try to access the HTTPS version no matter what you do (as they should), so only enable this if you’re sure about it.
If you decide to set the headers in the Nginx config (and not e.g. in your Rails app), this is how it should look:
add_header Strict-Transport-Security "max-age=31536000; includeSubDomains";
You can also start with a smaller timeout and then raise it later:
add_header Strict-Transport-Security "max-age=86400";