Photo library changes in iOS 14
I’m the kind of person who cares a lot about their digital privacy. It makes me very uncomfortable when I see ads on Facebook for something I opened on another site a moment ago, and I generally don’t like it when companies are learning more about me than they should, even if the effects of that tracking aren’t as obvious.
That’s why for example I’ve been trying to move away from Google services as much as possible (I use ProtonMail as my main email and Apple’s iWork for documents), I also started using Tresorit and iCloud1) for file sync instead of Dropbox. That’s also one of the reasons why I’ve always used some kind of ad & tracker blocker in my browsers - previously Ghostery, now I also use Brave and I’ve been experimenting with making my own ad blocker.
So it always makes me happy when Apple introduces another change to their OSes that limits the kinds of data that Mac and iOS apps can use without our permission. I especially liked:
- when iOS 11 introduced the “While Using” option for location access that was non-optional for apps
- the “Allow Once” option for location access in iOS 13
- permissions to things like camera, microphone or screen recording on the Mac
This year Apple made another batch of changes that limit apps' access to data. The most interesting ones are the approximate location access and the limited photo library - in this post I’ll talk about the latter.
Most of us have thousands of photos on our phones, often going a few years back - after all, our iPhones are our primary cameras these days. These photos and videos capture everything we do, the places we go to, who we meet with and what we do together. They also include location info in their metadata. This is all possibly extremely sensitive data.
So far however if you wanted to upload a single photo or screenshot to e.g. Twitter or Facebook or send it to a friend through a messaging app, you had to grant them access to your whole photo library - it was all or nothing. And you could never be sure what they do with it - are they just looking at this single picture, or maybe looking through your whole 30 GB library for any interesting stuff they can find there, and uploading that to their servers? Hopefully they aren’t, but you just had to trust them on this.
Apple had previously provided a system image picker (UIImagePickerController) that lets the user choose a photo from their library and pass it to the app without giving it access to the library, as well as a way to save photos to the library without seeing what else is there (UIImageWriteToSavedPhotosAlbum()). However, for various reasons these don’t seem to be widely used in popular apps - most apps that do anything with photos currently ask for full read-write access to the whole library, just because they can.
So this year Apple is taking a bit of a carrot and stick approach: the carrot is a new improved system photo picker, while the stick is a new way for the user to only give the app access to selected photos.
PHPicker
PHPicker (not an actual name you can find in the docs, but a general name Apple uses for this new API) is a new system photo picker, a replacement for the old UIImagePickerController. The two most important differences are:
- it has an integrated search, so it can help you find some specific photos that may not be recent
- unlike
UIImagePickerControllerit allows multiple selection
It also has an updated design, and while you’re scrolling the photo grid you can zoom in and out to see more or less photos at the same time:

How to use the picker
The API consists of a few types with the PHPicker* prefix, and most of them are surprisingly simple.
The main class that handles the picker screen is PHPickerViewController. It has a delegate protocol, PHPickerViewControllerDelegate, which you need to implement. You also need a PHPickerConfiguration object to pass it to the picker controller, in which you can set a few options for the picker.
You create a picker controller like this:
var config = PHPickerConfiguration()
// ...
let picker = PHPickerViewController(configuration: config)
picker.delegate = self
There are currently two options you can set in the picker configuration:
1) selectionLimit
This is the maximum number of items that the user can pick. The default is 1, and you can set it to some specific number, or to 0 to allow unlimited selection.
config.selectionLimit = 0
2) filter
The filter can be one of .images, .livePhotos, .videos, or a subset of those created using the .any(of:) helper:
config.filter = .images
config.filter = .any(of: [.images, .livePhotos])
Once the picker is configured, you can present it in the usual way:
present(picker, animated: true)
The last thing to do is to implement PHPickerViewControllerDelegate, which includes literally a single method: picker(_: didFinishPicking results:). This method is called with a list of one or more PHPickerResult objects in the response when the user confirms their selection. With single selection it returns immediately when the user taps a photo, and with multi-selection they need to confirm it with a toolbar button when they finish selecting.
The only part here that is not simple is that the photos are returned wrapped in NSItemProvider objects (used e.g. in the drag & drop API, or in some kinds of extensions). You need to get that item provider and first call canLoadObject(ofClass:) and then loadObject(ofClass:) (though I’m not 100% sure if the first is technically required).2)
You also need to dismiss the picker view - it doesn’t hide itself automatically:
func picker(
    _ picker: PHPickerViewController,
    didFinishPicking results: [PHPickerResult])
{
    picker.dismiss(animated: true)

    for result in results {
        let provider = result.itemProvider

        if provider.canLoadObject(ofClass: UIImage.self) {
            provider.loadObject(ofClass: UIImage.self) { image, error
                // ... save or display the image, if we got one
            }
        }
    }
}
Apple is expecting that most apps that only access the photo library to attach one or two pictures to a post will switch to this new system picker now. (The old UIImagePickerController is deprecated - that is, the class itself is not, but it’s only keeping the camera part of its functionality.)
And if they don’t like the carrot… well, then there’s still the stick.
Limited photo library
The stick is that there is now a standard way for the user to only grant an app access to a selected subset of photos (most likely just a few, since they need to manually tap each one). This is *not opt-in* for apps - it affects every app immediately, even those that have been built on older SDKs.
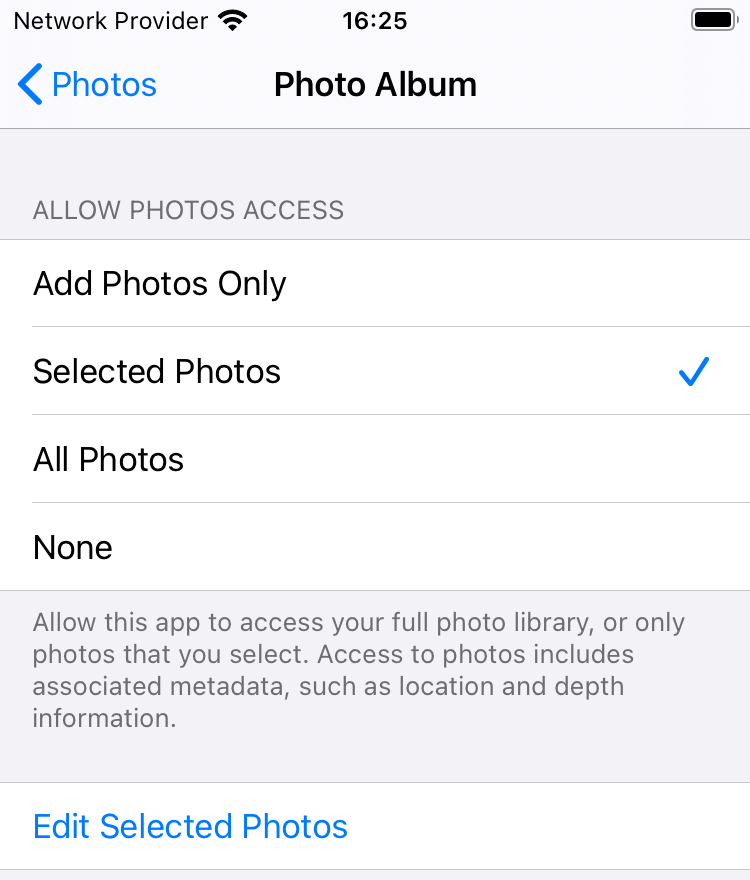
The way it works is that when the app tries to access the photo library (or explicitly asks for authorization), the user will now see a popup that looks like this:

The top option leads them to a selection dialog which is the same new picker you’ve seen above.
When the user confirms the selection, the app gets access to a kind of “virtual” photo library that only contains those few photos they’ve selected. To the app it looks almost like a normal photo library, it just has 5 photos in it instead of 2000 - that’s how it can work in existing apps. The app can’t access the remaining photos in any way, or even have any idea how many there are in total.
It can however tell whether it got access to the full library, or some limited subset. You can use the PHPhotoLibrary.authorizationStatus method for this (which has an updated API - it now requires an accessLevel parameter, which is .addOnly or .readWrite):
switch PHPhotoLibrary.authorizationStatus(for: .readWrite) {
case .notDetermined:
    // ask for access
case .restricted, .denied:
    // sorry
case .authorized:
    // we have full access

// new option:
case .limited:
    // we only got access to a part of the library
}
To ask for access, you also need to pass the accessLevel parameter (remember to include a NSPhotoLibraryUsageDescription key in your Info.plist):
PHPhotoLibrary.requestAuthorization(for: .readWrite) { status in
    // …
}
For backwards compatibility, the old (deprecated) versions without the parameter return .authorized even when you get limited access.
Updating the selection
You’re probably asking now: how can the user update the selection? If we’re talking about an app like Twitter or Facebook Messenger, the user will only select a few photos that they want to share, but next time when they want to post a photo, they will already be authorized - so the popup won’t appear, and they will just be choosing from the same few photos they chose last time. Not good.
So there are a few ways to solve this:
1) Settings
The user can always go to the Settings app, the Privacy section and update their selection there. However, they need to first know that there is such option and where to find it (the app can’t even deep-link to this specific page), so this is more like a last resort fallback.
2) Repeated alert
By default if the user grants limited access to the photo library to an app, they will see the same popup again after the app is restarted, and through that popup they can update their selection. This is also more of a way to somehow imperfectly support apps that haven’t been updated to the latest SDK - it solves the problem, but in an awkward way and only partially, since the popup won’t appear if you just hide the app, take a few more photos and open it again to share them, and the app doesn’t restart in the meantime.
3) Showing the selection UI again
If you want handle this properly, the recommended way is to manually request to show the selection UI again. Apple explains that if you have an app that requires full access to the photo library (e.g. some app whose main purpose is to let you browse and organize the photo library), you should add some kind of button in your UI that triggers the selection screen again. This button should only appear if authorizationStatus is .limited, and hide if the user grants the app full access.
To show the selection UI, call this new method:
PHPhotoLibrary.shared().presentLimitedLibraryPicker(from: self)
The selection screen hides automatically when the user completes selection. You will not be notified of the result through any delegate method - you need to use a “change observer” to track when the set of available photos changes. Implement the protocol PHPhotoLibraryChangeObserver and call the register(_ observer:) method on the PHPhotoLibrary:
PHPhotoLibrary.shared().register(self)

func photoLibraryDidChange(_ changeInstance: PHChange) {
    // ...
}
Once you do that, it makes sense to disable that automatic alert mentioned in point 2 above - to do that, add the key PHPhotoLibraryPreventAutomaticLimitedAccessAlert to your Info.plist.
4) Using a system picker
The best option though is that you don’t ask for access to the photo library at all 😏 Remember the carrot? If you use the new system picker, you don’t need to ask for photo library authorization. The picker runs in a separate process, it handles the selection for you and sends you back only what the user selected, so they implicitly grant you access to those photos they picked. No other popups, no checking for authorization.
So if you have an app that currently uses some kind of sliding sheet showing recent photos from which the user picks one to attach it to a post, you really, really should consider just using the system picker, instead of keeping the sheet as a kind of “staging area” and adding another unnecessary step to the flow.
Saving to the library
One special case is when you only need to save to the library, but don’t need to read from it - e.g. you want to let your users save some pictures from a feed or a website. In this case, you only need to ask for an “add only” access, which users may be more likely to grant if it’s obvious that your app doesn’t have any legitimate need for a read access. This is mostly unchanged from earlier iOS versions.
To save a picture to user’s library, you can use this method:
UIImageWriteToSavedPhotosAlbum(image, self, #selector(onImageSaved), nil)
Or just pass nils if you don’t need a callback:
UIImageWriteToSavedPhotosAlbum(image, nil, nil, nil)
If you don’t have any authorization at this point yet, it will trigger a popup asking about one - but it uses a different wording and options that the one for read-write access, making it clear that this is about add-only access:

You also need to include the usage key NSPhotoLibraryAddUsageDescription in your Info.plist.
If you’d prefer to ask the user for write access explicitly, you can use the same requestAuthorization method:
PHPhotoLibrary.requestAuthorization(for: .addOnly) { status in
    …
}
It will be interesting to see in the coming months how popular apps like Twitter, Facebook, Messenger etc. react to this new situation. The ideal scenario would be that they all switch to PHPicker and avoid the trouble with limited access - this is also, I believe, better UX for the users than if they insist on using library access and presentLimitedLibraryPicker. The worst case scenario is that they do nothing, assume that most users don’t care about privacy or will be too lazy and will just grant them full access, and those who insist on protecting their private photos will be left with working but kinda awkward user experience. Or maybe they’ll figure out something that works well - we’ll see.
1) Yes, I know that iCloud Drive is not end-to-end encrypted - but I trust Apple infinitely more than I trust Google and Dropbox. Hopefully they will add full encryption at some point - they are slowly expanding the range of things that are end-to-end encrypted, e.g. last year they’ve added some synced Safari data to the list. ↩︎
2) This doesn’t seem to currenly work in the simulator in beta 1, including in Apple’s sample code from the talk about the picker. I haven’t tried on a real device. ↩︎
3 comments:
Rahul Vyas
Is it possible to show only local assets in the new iOS 14 picker (PHPickerViewController)?
Kuba • mackuba.eu
I'm not sure how it works with iCloud Photos if that's what you mean, because I only have local assets on my phone, but looking at the API I don't think it's possible to filter items by location of the asset, only by type (images/videos etc.). I suppose that to be able to request to filter by specific locations you'd need more knowledge about what kinds of locations there are, and that's probably something you need full library access for...
Maor
Thanks so much! still helpful!