RipTip - pretty tooltips for RightJS
I’m working on a new version of this blog, in which I want to use RightJS. This week I wanted to add some kind of pretty JavaScript tooltips there; there is a Tooltip class in RightJS, but I don’t like the way these tooltips look. However, I know a jQuery library called “TipTip” which adds very attractive black tooltips. So I took the TipTip code and rewrote it using RightJS (and renamed to RipTip, for obvious reasons) – code is available on GitHub, as usual.
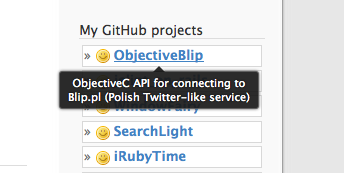
This is how the tooltips look:

To see them in action, see the original TipTip blog post (my tooltips look exactly the same, or at least they’re supposed to) or this simple test page.
Usage
You need to download two files, riptip.js and riptip.css and add them to your page header:
<link rel="stylesheet" href="stylesheets/riptip.css" type="text/css">
<script type="text/javascript" src="javascripts/riptip.js"></script>
To attach a RipTip tooltip to an element, give it a title attribute and either call RipTip directly:
RipTip.attachTo(link, { options... });
or using a shortcut method added to Element:
$('link').riptip({ options... });
$$('a[title]').each('riptip', { options... });
RipTip will remove the title attribute from given elements and will display the contents of that attribute in a custom tooltip.
Elements which have tooltips attached to them fire two custom events: riptipEnter when you mouseover an element, before the animation starts, and riptipLeave when the cursor leaves the element and before the fade-out animation starts; you can bind actions to these events like this:
$('link').riptip().on({
  'riptipEnter': function() { ... },
  'riptipLeave': function() { ... }
});

// or:
$('link').riptip().on('riptipEnter', function() { ... });
Options
You can pass any of these in the options attribute:
maxWidth(default: “200px”) – tooltip’s maximum widthedgeOffset(default: 3) – distance between the element’s border and the top of the tooltip’s arrow (in px)delay(default: 400) – amount of time before tooltip appears (in ms)fadeIn(default: 200) – length of the fade in animation (in ms)fadeOut(default: 200) – length of the fade out animation (in ms)
Of course you can also tweak the CSS to change the way the tooltips look.
If you’d like to make some improvements, or you don’t like the way it works, or you find a bug – feel free to fork it and send me pull requests :)
11 comments:
Nikolay
Glad to see you're having fun with RightJS. And I see there are some fancy stuff in your CSS that I could learn.
As for the implementation, why didn't you use event's delegation kinda like the later implementation of Tooltips does? So that the users didn't need to bind anything manually.
But in general, looks like fun. Keep 'em coming!
btw: i'm looking for people who interested in writing some skins/themes for RightJS UI, so if the problem mostly in the appearance, you can write some css theme, I'd be glade to merge it into the official codebase.
Kuba
Regarding event delegation - I'm not sure what you mean... which part of the code are you talking about?
As for CSS, it's his CSS, not mine ;) And in the built-in tooltips, the thing that I dislike the most is probably the fact that they stop moving when they start disappearing... which, I suppose, should be easy to fix, just clear the 'current' variable at the end of animation, not before it, right? (Anyway, I just thought it could be fun to rewrite the jQuery one, and it was ;)
Nikolay
I mean that instead of attaching your tooltips manually to every link, you could simply attach two document level listeners for mouseover and mouseout, and then check the event target elements for matching your css rule.
Kuba
Honestly, I can't see anything like that here http://github.com/rightjs/rightjs-ui/blob/master/src/tooltips/tooltip.js - unless you're talking about some other tooltips... here it looks like the functions are just attached to a single element's mouseover and mouseout.
Anyway, wouldn't what you describe be way slower? I mean, the functions would be called for every single element on the page instead of just selected few...
Nikolay
oops, I've mistaken them with the lightbox widget http://github.com/rightjs/rightjs-ui/blob/master/src/lightbox/document.js
not at all, the bubbling is handled natively by the browser. then inside of your document level handler you can optimize the things a lot by manual target elements checking, like say in your case you just check the tag name and if it has a title. Those two simple checks will happen really fast noone will notice.
The lightbox implementation is far from optimal, but check the demo page you won't notice any disturbances when you move the mouse over the page back and forward.
Kuba
But in that file, you only bind click event, not mouseover and mouseout :) Clicks happen much less often than mouseovers...
Nikolay
yes, you're right, that probably was a wrong example in terms of performance.
but take a look at the drag-n-drop module, it handles not just hovers, but mousemove at the document level, along with some more stuff like available range, elements overlapping and causes the page rerendering coz an element was moved. and it works pretty fast and smooth.
I've already tried this technique in couple of cases, it works unnoticeable fast even on IE6. the modern browsers don't fill it at all.
You should give it a try, you will love it 8)
parsifal
Hi there. I wonder could you please make some small demo. I don't quite get instructions on how to apply it. I get first piece of code, I need to put it in header,
but the rest I don't quite understand, on both blogs. Small demo would be really nice, and appreciated, to get the idea how stuff really work.
Kuba
Specially for parsifal: http://dl.dropbox.com/u/41808/blog/riptip_test/test.html
parsifal
excellent. great. thanks a lot. btw, is there any way to make tooltip show above [up] instead of down?
Kuba
No, it's not possible at the moment (this only happens when the element is near the bottom edge of the page).