How to add icons to the menu bar on Yosemite
Mac applications often add their icons to the notification area on the right side of the menu bar. That way they can show you some status changes by changing the icon image, and they can also save some space in your dock by removing the icon from there while still being easily accessible.
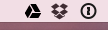
If you’re like me, you probably have quite a lot of those there:

The menu bar controls usually display their standard (preferably dark) icon on a standard background by default, and an inverted white icon on a blue background when clicked:


Creating the status item
To create such control in your app, you need to create an NSStatusItem object and add it to the NSStatusBar:
@interface StatusBarController {
  NSStatusItem *statusItem;
}

// ...

- (void)createStatusBarItem {
  NSStatusBar *statusBar = [NSStatusBar systemStatusBar];
  statusItem = [statusBar statusItemWithLength:NSSquareStatusItemLength];
  // ...
}
Make sure to keep a strong reference to the NSStatusItem – otherwise ARC will clean it up and it will only blink in the menu bar and disappear immediately.
Configuring the images (old way)
You also need to prepare the icon image. In older versions of OSX, the standard approach was to create two separate images, a normal and an inverted one, and assign them to the image and alternateImage properties respectively. This had the advantage that you could make the icons look however you wanted, e.g. the old Dropbox icon (which I really miss) was blue instead of black, which made it much easier to find it in the menu bar.
You also had to remember to set the highlightMode property, which tells OSX to change the background of the control to blue when selected; the default was to not change it, showing a white icon on a light background, which looked pretty bad.
- (void)createStatusBarItem {
  NSStatusBar *statusBar = [NSStatusBar systemStatusBar];
  statusItem = [statusBar statusItemWithLength:NSSquareStatusItemLength];

  statusItem.image = [NSImage imageNamed:@"icon_menu.png"];
  statusItem.alternateImage = [NSImage imageNamed:@"icon_menu_inverted.png"];
  statusItem.highlightMode = YES;
}
Fixing the icon on Yosemite
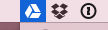
However, in OSX Yosemite Apple introduced a “dark mode” where the menu bar has a dark background and the icons are supposed to be light (you can enable it in the first section of the “General” System Preferences panel). If you’re doing it the old way as described above, the menu icon by default will probably be almost invisible. You can see that e.g. in the Google Drive app (at least you could when I was writing this, I’m assuming they’ll fix it sooner or later):
The solution? Let OSX generate the inverted icon automatically. The trick is to use the template property of NSImage – if you set it to true, OSX will only use it to determine the shape of the icon and will fill it with the right color automatically, so it will display correctly in normal and highlighted state and in light and dark mode.
- (void)createStatusBarItem {
  NSStatusBar *statusBar = [NSStatusBar systemStatusBar];
  statusItem = [statusBar statusItemWithLength:NSSquareStatusItemLength];

  NSImage *icon = [NSImage imageNamed:@"icon_menu.png"];
  icon.template = YES;

  statusItem.image = icon;
  statusItem.highlightMode = YES;
}
If you don’t need to support any OSX versions older than 10.10, then you don’t need highlightMode, which is marked as deprecated now and doesn’t have any effect – the control is always highlighted. Most of the other methods in NSStatusItem have also been deprecated and were moved to a new button property, so you should access them this way instead:
- (void)createStatusBarItem {
  NSStatusBar *statusBar = [NSStatusBar systemStatusBar];
  statusItem = [statusBar statusItemWithLength:NSSquareStatusItemLength];

  NSImage *icon = [NSImage imageNamed:@"icon_menu.png"];
  icon.template = YES;

  statusItem.button.image = icon;
}
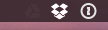
A properly configured menu bar icon behaves like this on Yosemite:


Note: this only works if you want your icon to be monochrome – dark gray by default and white in dark mode or when highlighted (this is how Apple recommends it should work anyway). If you want the icon to be colorful, like the old Dropbox icon, you’ll need to find a different way to do this (or you might not need to do anything at all – for example the blue graph controls in older iStat Menus display just fine in dark mode).
Adding a menu
A menu icon isn’t very useful if it doesn’t show anything when clicked. Some apps show some fancy popover panels when you click their icon (CloudApp, Dropbox), but the standard approach is to just show a plain old NSMenu with a few items.
To assign a menu to the menu bar control, create an NSMenu object with some NSMenuItems and assign it to the status item’s menu property. You can create the menu in a XIB or simply in code:
- (void)createStatusBarItem {
  // ...
  statusItem.menu = [self createStatusBarMenu];
}

- (NSMenu *)createStatusBarMenu {
    NSMenu *menu = [[NSMenu alloc] init];

    NSMenuItem *online =
      [[NSMenuItem alloc] initWithTitle:@"Online"
                                 action:@selector(setStatusToOnline)
                          keyEquivalent:@""];
    [online setTarget:self];
    [menu addItem:online];

    NSMenuItem *away =
      [[NSMenuItem alloc] initWithTitle:@"Away"
                                 action:@selector(setStatusToAway)
                          keyEquivalent:@""];
    [away setTarget:self];
    [menu addItem:away];

    return menu;
}
Removing the dock icon
Once you have a menu bar icon, it might make sense to remove the icon from the dock. If it’s the kind of app that doesn’t need a dock icon at all (like CloudApp, Dropbox or my Gitifier), then you can configure this in Info.plist – create an LSUIElement property and set it to YES (the “descriptive name” in Xcode is “Application is agent”).
If you want to let the user choose a dock icon or a menu icon in the preferences, like e.g. some instant messaging apps, then obviously you need to do it differently – NSApplication has a setActivationPolicy: method that lets you change the same thing at runtime. The default value NSApplicationActivationPolicyRegular corresponds to LSUIElement set to false (dock icon enabled), and NSApplicationActivationPolicyAccessory is the same as LSUIElement set to true (no dock icon):
[NSApp setActivationPolicy:NSApplicationActivationPolicyAccessory];
You need to call this when a relevant checkbox is clicked in your preferences window, and you also need to store the value in the user defaults and call this at startup, preferably as soon as possible – otherwise if the dock icon is disabled it might still appear for a brief moment. (You might not be able to get rid of this effect completely, since after you start the app it takes a moment before any of your code starts executing at all, so if your app should never have a dock icon, it’s better to use the LSUIElement method instead.)
- (void)hideDockIconValueChanged:(BOOL)value {
    [[NSUserDefaults standardUserDefaults] setBool:@(value)
                                            forKey:HideDockIconKey];

    if (value) {
        [NSApp setActivationPolicy:NSApplicationActivationPolicyAccessory];
    } else {
        [NSApp setActivationPolicy:NSApplicationActivationPolicyRegular];
    }
}

- (void)applicationWillFinishLaunching:(NSNotification *)notification {
    if ([[NSUserDefaults standardUserDefaults] boolForKey:HideDockIconKey]) {
        [NSApp setActivationPolicy:NSApplicationActivationPolicyAccessory];
    }
}
4 comments:
Dmitry Nikolaev
I wrote a little framework for menubar app handling depending on Mac OS version. Might be helpful:
https://github.com/dmitrynikolaev/MenuBarController
Kuba
Nice, looks useful!
nikita
Thanks for this useful tutorial. I have 2 questions:
-My menu appears only when I do ctrl+click. How do I get it appear on just a click?
-My menu appears right where my mouse is. I want it to show under the menu bar icons. How can I do that?
Kuba
@nikita - hmm, you must be doing something differently than I am, because it's definitely not supposed to work this way, I have no idea how you could have achieved such effect...